X-Payments:3D-Secure settings
- X-Payments:General information
- What's New
- System requirements
- Installation
- Two-factor user authentication
- Configuring X-Payments
- Managing users
- Customizing the interface
- Managing payments
- Unistalling X-Payments
- Upgrading
- Moving X-Payments from one host to another
- Viewing X-Payments logs
- FAQ
- Troubleshooting
- Glossary
- Supported payment gateways
- Popular Payment Methods Configuration Instructions
X-Payments allows you to use 3-D Secure Payer Authentication for a number of payment methods that support it. 3-D Secure provides an additional layer of security for payment transactions via your store by implementing Verified by Visa and MasterCard SecureCode.
Some payment solutions supported by X-Payments provide their own built-in integrated 3-D Secure authentication systems that can be used with X-Payments. Such solutions include:
- PayPal's Payflow Pro,
- Cardinal Commerce Centinel,
- Elavon Payment Gateway,
- Global Iris/HSBC - RealAuth Remote,
- Realex,
- Sage Pay Go - Direct Interface,
- Worldpay Corporate Gateway - Direct Model.
For many other payment solutions it is possible to use the 3-D Secure authentication by CardinalCommerce (X-Payments provides an integrated module for this purpose). Solutions that can be used with 3-D Secure authentication by CardinalCommerce include:
- PayPal Payments Pro,
- Authorize.Net AIM and CIM,
- Bean Stream/FirstData Canada,
- Caledon, *
- CyberSource - SOAP toolkit API.
(Up-to-date information on the type of 3-D Secure system supported by specific payment gateways integrated with X-Payments can be found in the X-Payments:Supported payment gateways table.)
If you are going to use a payment solution that provides a built-in 3-D Secure authentication service, you do not need to set up 3-D Secure in X-Payments: 3-D Secure authentication will work for your payment transactions out of the box. However, if you are going to use 3-D Secure via CardinalCommerce, you will need to configure some 3-D Secure settings in X-Payments.
CardinalCommerce's 3-D Secure is configured differently in different versions of X-Payments. For instructions, see the appropriate section below:
Managing your 3-D Secure system configuration in X-Payments 1.0 or 2.0
To start using CardinalCommerce 3-D Secure payer authentication in X-Payments 1.0 or 2.0:
- Sign up for the respective service with CardinalCommerce (CardinalCommerce can be contacted at xpayments@cardinalcommerce.com).
- CardinalCommerce 3-D Secure requires X-Payments to temporarily store cardholder data, so make sure that storage of cardholder data has been enabled in the Settings -> General settings section and cardholder data encryption keys have been properly generated.
- Add a 3-D Secure system configuration for the CardinalCommerce module.
- Enable your CardinalCommerce 3-D Secure system configuration.
- Assign your CardinalCommerce 3-D Secure system configuration to the payment configuration for which you want to use 3-D Secure.
To add a 3-D Secure system configuration for the CardinalCommerce module:
- On the '3D-Secure Settings' page (Settings -> 3-D Secure settings), click Add new next to New configuration for: CardinalCommerce.
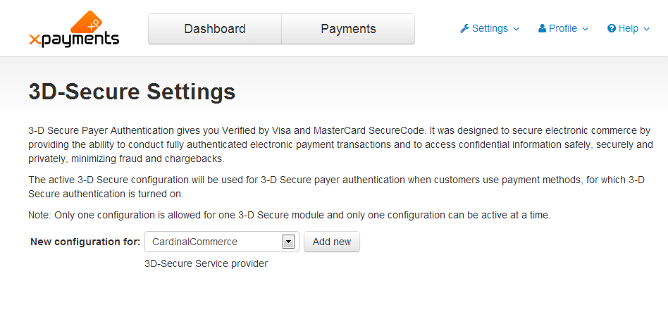
A page titled 'Add new 3D-Secure configuration' will be opened displaying the dialog box for providing your CardinalCommerce module configuration settings: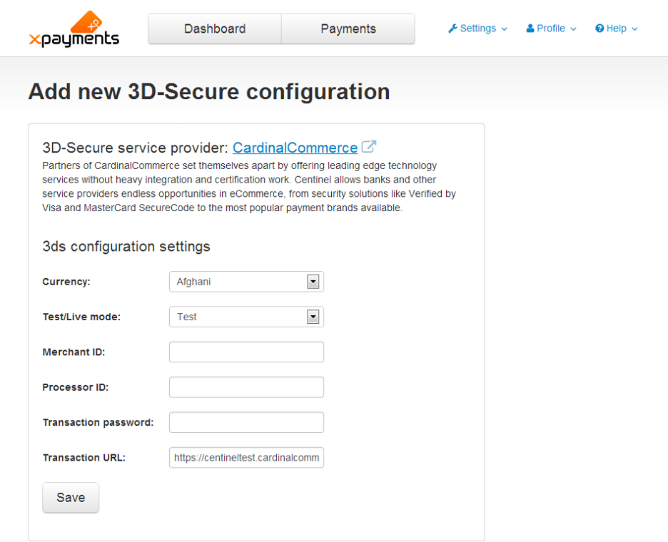
- Adjust the configuration settings for CardinalCommerce module:
- Currency: The currency your online store uses to conduct transactions.
- Test/Live mode: The mode in which you wish to use 3-D Secure (Test or Live).
- Merchant ID: The MerchantID value provided to you by CardinalCommerce.
- Processor ID: The ProcessorID value provided to you by CardinalCommerce.
- Transaction password: The Transaction password provided to you by CardinalCommerce.
- Transaction URL: The TransactionURL provided to you by CardinalCommerce. The transaction URL for testing purposes is https://centineltest.cardinalcommerce.com:443/maps/txns.asp.
- When you are done adjusting all the fields, click Save to save the changes.


That is all, you have just added your 3-D Secure system configuration. Now you need to enable it and assign it to the payment configuration or which you want to use 3-D Secure.
After a 3-D Secure system configuration has been added, you can see it on the '3-D Secure Settings' page:

The following actions are available:
- View/edit the configuration details;
- Enable/disable the configuration;
- Delete the configuration.
To view/edit the details of your 3-D Secure system configuration:
- On the '3-D Secure settings' page: Click on the name of the configuration (CardinalCommerce). The page showing the configuration details will be opened. If necessary, adjust the settings and click Save.
To enable/disable your 3-D Secure system configuration:
- On the '3-D Secure settings' page:
X-Payments 1.0: Click the [ enable ] / [ disable ] link opposite the configuration name.
X-Payments 2.0: Click the button dropdown element opposite the configuration name and select the required action (Enable / Disable) from the menu.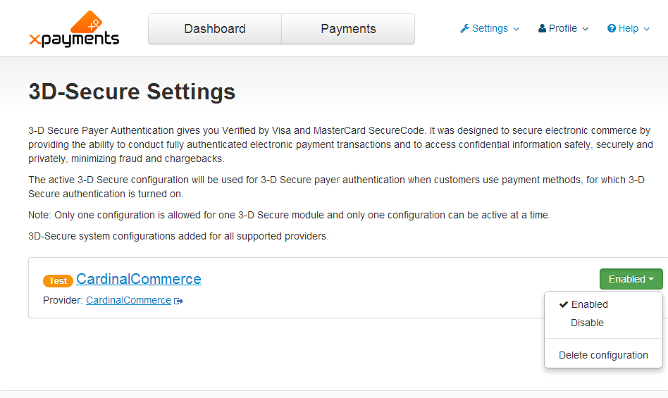
- On the '3-D configuration: <configuration name>' page:
X-Payments 1.0: Click on the 'Configuration is active [ make inactive ] / 'Configuration is inactive [ make active ] link.
X-Payments 2.0: Click the button dropdown element near the configuration name and select the required action (Enable/Disable).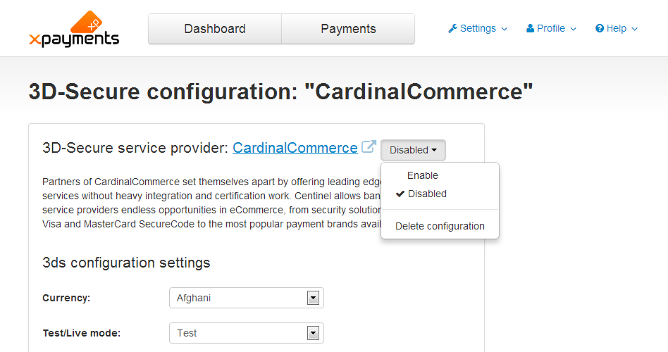


To delete your 3-D Secure system configuration:
- On the '3-D Secure settings' page:
X-Payments 1.0: Click the delete icon opposite the configuration name.
X-Payments 2.0: Click the button dropdown element opposite the configuration name and select the required action (Delete configuration) from the menu. - On the '3-D configuration: <configuration name>' page:
Click on the Delete configuration link at the bottom of the page. Confirm the deletion.
To assign your 3-D Secure system configuration to a payment configuration:
- Locate the payment configuration to which you want to assign your 3-D Secure system configuration, open its details for viewing|editing, enable the option Use external module (CardinalCommerce) and save the changes.Note: The setting 'Use external module (CardinalCommerce)' appears on the payment configuration page only after steps 1-3 of the 'add a 3-D Secure system configuration' procedure have been properly completed.
Managing your 3-D Secure system configuration in X-Payments 2.1
To start using CardinalCommerce 3-D Secure payer authentication in X-Payments 2.1:
- Sign up for the respective service with CardinalCommerce (CardinalCommerce can be contacted at xpayments@cardinalcommerce.com).
- CardinalCommerce 3-D Secure requires X-Payments to temporarily store cardholder data, so make sure that storage of cardholder data has been enabled in the Settings -> General settings section and cardholder data encryption keys have been properly generated.
- Add and enable 3-D Secure for each payment configuration in your X-Payments installation that needs to use 3-D Secure via CardinalCommerce.
- In the details of all the online stores that will be using your 3-D Secure enabled payment configuration, specify the template that should be used for the 3-D Secure payer authentication step.
To add and enable 3-D Secure for a payment configuration:
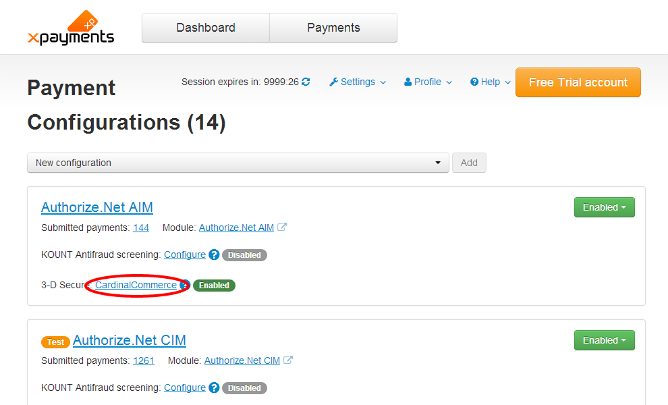
- Go to the 'Payment Configurations' page (Settings -> Payment configurations) and locate the payment configuration for which you want to enable 3-D Secure payer authentication via CardinalCommerce. Click on the "3-D Secure: CardinalCommerce" link for this payment configuration. For example, if we want to configure 3-D Secure payer authentication for Authorize.Net AIM, we need to select this link:
A page titled 'CardinalCommerce 3D-Secure configuration settings' opens: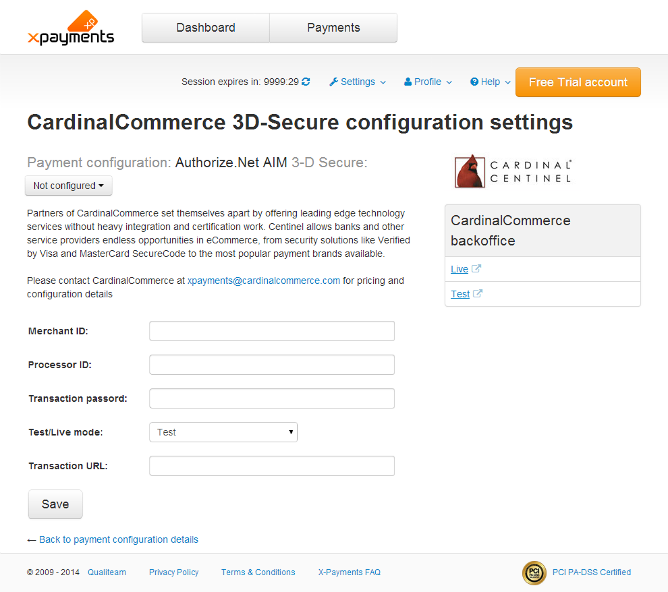
- Use the 'CardinalCommerce 3D-Secure configuration settings' page to provide your CardinalCommerce module configuration settings for the selected payment configuration:
- Adjust the following fields:
- Merchant ID: The MerchantID value provided to you by CardinalCommerce.
- Processor ID: The ProcessorID value provided to you by CardinalCommerce.
- Transaction password: The Transaction password provided to you by CardinalCommerce.
- Test/Live mode: The mode in which you wish to use 3-D Secure (Test or Live).
- Transaction URL: The TransactionURL provided to you by CardinalCommerce. The transaction URL for testing purposes is https://centineltest.cardinalcommerce.com:443/maps/txns.asp.
- When you are done adjusting all the fields, click Save to save the changes.
The 3-D Secure system configuration will be created.
- Adjust the following fields:
- Enable the 3-D Secure system configuration you have created: On the 'CardinalCommerce 3D-Secure configuration settings' page for your selected payment configuration, click the Disabled button located next to the title "Payment configuration: <Payment configuration name> 3-D Secure", and select the action Enable from the button menu:
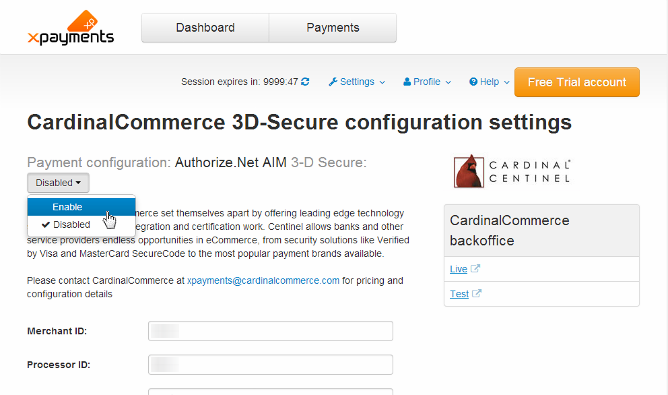
This will enable 3-D Secure payer authentication via CardinalCommerce for the selected payment configuration.


The status of 3-D Secure payer authentication service for any payment configuration can be found on the 'Payment configurations' page (Settings -> Payment configurations):

or on the 'Payment configuration details page:

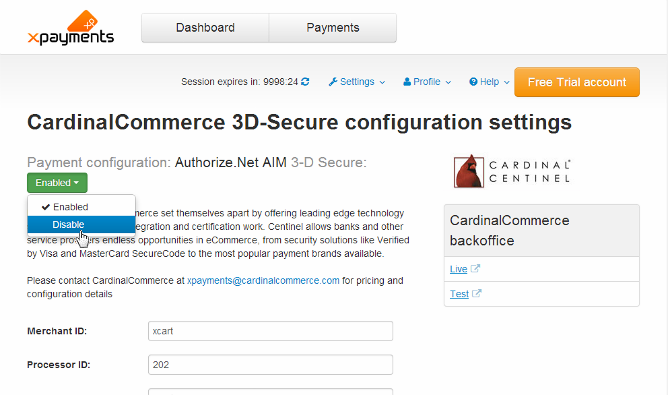
To disable/re-enable 3-D Secure for a payment configuration:
- Go to the 'Payment Configurations' page (Settings -> Payment configurations) and locate the payment configuration for which you want to disable/re-enable 3-D Secure payer authentication via CardinalCommerce. Click on the "3-D Secure: CardinalCommerce" link for this payment configuration. This opens the 'CardinalCommerce 3D-Secure configuration settings' page.
- Use the action button located at the top of the page next to the title "Payment configuration: <Payment configuration name> 3-D Secure" to select the action you require (Disable/Enable):

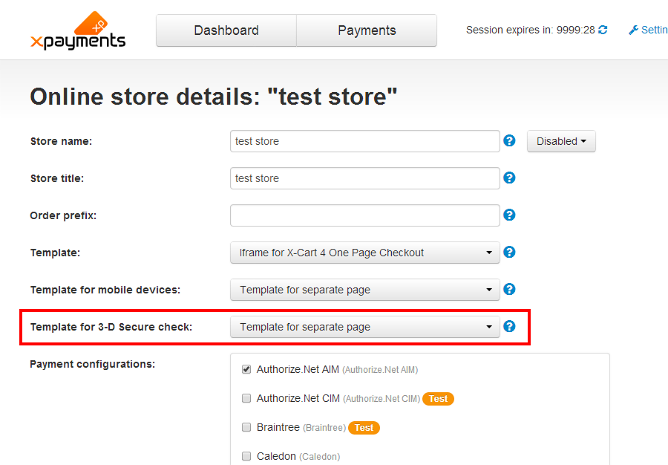
To specify the template that should be used in a specific store for 3-D Secure checks:
- Go to the 'Online Stores' page (Settings -> Online stores), click on the name of the store for which you want to set the template that should be used for the 3-D Secure payer authentication step.
- On the page that opens, select the template you require from the Template for 3-D Secure check box:
- Click Save at the bottom of the page to save the changes.

|