Difference between revisions of "X-Payments:FirstData"
(Created page with "To be able to use FirstData Global Gateway, complete the following steps: # Click <u>Settings > Payment Configurations</u>. # Select "FirstData Global Gateway - API" from the...") |
m |
||
| (2 intermediate revisions by the same user not shown) | |||
| Line 1: | Line 1: | ||
| − | To be able to use | + | To be able to use First Data Payeezy Gateway (formerly Global Gateway e4), complete the following steps: |
| − | # Click | + | # Click '''Settings''' > '''Payment configurations'''. |
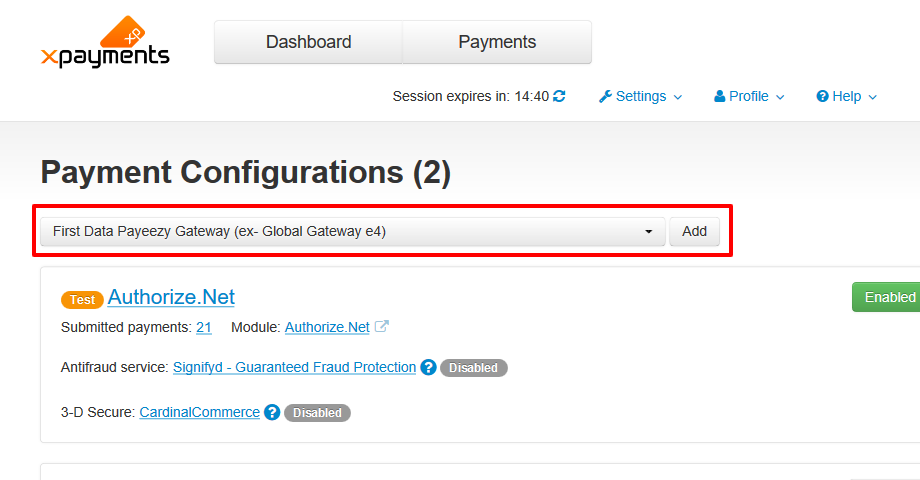
| − | # Select " | + | # Select the "First Data Payeezy Gateway (ex- Global Gateway e4)" from the 'New configuration' select box and click '''Add''':<br/>[[File:Firstdata_conf_add.png|border]]<br/> |
| + | # On the page that opens, configure the settings for your FirstData payment configuration:<br/>[[File:Firstdata_confsettings.png|border]]<br/> | ||
# Complete the fields on this page: | # Complete the fields on this page: | ||
#* '''Name''': Enter the name of your FirstData configuration. | #* '''Name''': Enter the name of your FirstData configuration. | ||
| − | #* ''' | + | #* '''Exact ID (or Gateway ID)''': Enter your Exact ID (also known as Gateway ID). This value identifies the Merchant and Terminal under which the transaction is to be processed. |
| − | #* ''' | + | #* '''Password''': Enter your password. This value authenticates the Payeezy Gateway Web Service API request. Should not be exposed to the public. |
#* '''Test/Live mode''': Select from ''Test'' or ''Live''. | #* '''Test/Live mode''': Select from ''Test'' or ''Live''. | ||
| − | # | + | #* '''Initial transaction''': Choose ''Auth'' or ''Auth and capture''. |
| + | #* '''Order prefix''': Your trading name or any other prefix that will help you to identify a payment transaction as originating from this store. The "Order prefix" field is required when using the same account for more than one online store. | ||
| + | #* '''Currency''': The currency that should be used for payments via this method. | ||
| + | #* '''Security code required''': Specify whether the buyer should be required to enter a CVV code (Card Verification Value) on the payment page. | ||
| + | #* '''Credit card types''': Credit card types you are going to accept. | ||
| + | #* '''Cancel not captured''' Enable the checkbox option "Void not captured "auth only" payments in 30 days automatically" to ensure that the hold on the funds for which an authorization has been obtained is lifted automatically no later than 30 days after the payment if a capture of the funds has not been performed. | ||
| + | #* '''Use in online stores''': (Available in X-Payments Multistore) If you have already added some online stores in the 'Online Stores' section of the X-Payments back-end (Settings->Online Stores), here you will see the online stores you have added. Select the check box for your X-Cart store to enable the payment configuration in this store. If you haven't yet added your X-Cart store to the list of online stores working with X-Payments, you will be able to add the store and enable this payment configuration for it later after you are done defining the configuration settiongs for the PayPal Payments Pro (PayPal API) module on this page. | ||
| + | #* If an '''Antifraud service''' and/or a '''3-D Secure''' module have been configured for the current payment configuration, you may access and adjust the respective settings from this page. | ||
| + | # Click '''Save'''. | ||
Latest revision as of 09:51, 16 April 2020
To be able to use First Data Payeezy Gateway (formerly Global Gateway e4), complete the following steps:
- Click Settings > Payment configurations.
- Select the "First Data Payeezy Gateway (ex- Global Gateway e4)" from the 'New configuration' select box and click Add:
- On the page that opens, configure the settings for your FirstData payment configuration:
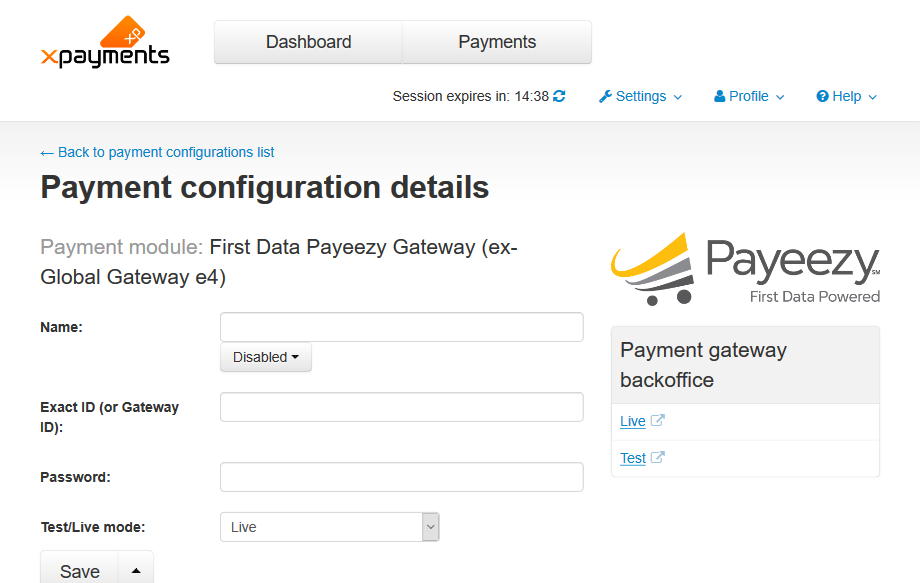
- Complete the fields on this page:
- Name: Enter the name of your FirstData configuration.
- Exact ID (or Gateway ID): Enter your Exact ID (also known as Gateway ID). This value identifies the Merchant and Terminal under which the transaction is to be processed.
- Password: Enter your password. This value authenticates the Payeezy Gateway Web Service API request. Should not be exposed to the public.
- Test/Live mode: Select from Test or Live.
- Initial transaction: Choose Auth or Auth and capture.
- Order prefix: Your trading name or any other prefix that will help you to identify a payment transaction as originating from this store. The "Order prefix" field is required when using the same account for more than one online store.
- Currency: The currency that should be used for payments via this method.
- Security code required: Specify whether the buyer should be required to enter a CVV code (Card Verification Value) on the payment page.
- Credit card types: Credit card types you are going to accept.
- Cancel not captured Enable the checkbox option "Void not captured "auth only" payments in 30 days automatically" to ensure that the hold on the funds for which an authorization has been obtained is lifted automatically no later than 30 days after the payment if a capture of the funds has not been performed.
- Use in online stores: (Available in X-Payments Multistore) If you have already added some online stores in the 'Online Stores' section of the X-Payments back-end (Settings->Online Stores), here you will see the online stores you have added. Select the check box for your X-Cart store to enable the payment configuration in this store. If you haven't yet added your X-Cart store to the list of online stores working with X-Payments, you will be able to add the store and enable this payment configuration for it later after you are done defining the configuration settiongs for the PayPal Payments Pro (PayPal API) module on this page.
- If an Antifraud service and/or a 3-D Secure module have been configured for the current payment configuration, you may access and adjust the respective settings from this page.
- Click Save.


|