X-Payments:Connecting LiteCommerce
Contents
Overview
X-Cart Next/LiteCommerce can be connected to X-Payments using the X-Payments connector add-on module. This ensures correct implementation of the following tasks:
- Importing the data on active payment methods from X-Payments to X-Cart Next/LiteCommerce;
- Transferring cart and customer details from LiteCommerce to X-Payments;
- Redirecting the customer from LiteCommerce to X-Payments and back to X-Cart Next/LiteCommerce;
- Synchronizing transaction and order details between X-Payments and X-Cart Next/LiteCommerce.
System requirements
To successfully install and use the X-Payments connector add-on module, you need:
- an installed copy of X-Cart Next/LiteCommerce v 1.1.0 or later;
- an installed copy of X-Payments v 1.0.5 or later;
- PHP extensions:
- libCurl version >= 7.10;
- OpenSSL extension;
- XML DOM extension (to parse XML data).
Video Tutorial
Connecting LiteCommerce to X-Payments
The following procedure assumes that:
- You have an X-Payments account created using https://www.x-payments.com/trial-demo.html
- You have completed configuring the connection to your LiteCommerce store in X-Payments.
After configuring the connection to your LiteCommerce store in X-Payments, log in to your LiteCommerce store Administrator back end and complete setting up the connection on the LiteCommerce end. The connection is done using the add-on module X-Payments connector which can be obtained through the LiteCommerce Modules Marketplace and installed using the standard LiteCommerce module installation procedure. After the installation, X-Payments connector needs to be configured.
To configure X-Payments connector:
- In the LiteCommerce store Administrator back end, go to the 'Manage add-ons' section (Click the Add-ons tab in the main Administrator menu).
- Locate the X-Payments connector item in the list of add-on modules installed at your store and make sure it is marked Еnabled.
- Click on the Configure link next to the X-Payments connector item. This opens the X-Payments connector module configuration page:
- Define the connection settings needed for your LiteCommerce store to interact with X-Payments: Copy the value of the Configuration bundle field from the X-Payments' Online Store Details page, paste the string here and click Deploy. All the connection settings will be specified automatically.
- Store ID: The unique value that will allow X-Payments to correctly identify requests coming from this store. This value is generated in the X-Payments back-end.
- X-Payment URL: The URL of your X-Payments installation; this URL is needed for the module be able to connect to X-Payments.
- Public key: The key to be used for encrypting the requests that the store will send to X-Payments. This key is generated in the X-Payments back-end.
- Private key: The key to be used for decrypting the responses and callback requests that the store will receive from X-Payments. This key is generated in the X-Payments back-end.
- Private key password: The password that should be used to decrypt the Private key. This password is generated in the X-Payments back-end.
- IP addresses for X-Payments callbacks: enter IP address of the server where X-Payments is installed. "127.0.0.1" can not be used here. For better understanding what IP address to put here see X-Payments:How_It_Works#Callback_from_X-Payments_to_the_store
- Click the Submit button.

Running a test transaction
You can run a test transaction to make sure the connection with X-Payments has been configured correctly:
On the X-Payments connector module configuration page, scroll down to the Test module section (this section appears below the Connection options fields after you deploy the Configuration bundle) and click the Test module button.

If the module is working correctly, the 'Test transaction successfully completed' message will be displayed.
Importing X-Payments payment methods into LiteCommerce
To be able to use the payment methods defined in X-Payments, you should import information about them into your LiteCommerce store. Complete the following steps:
- On the X-Payments connector module configuration page, scroll down to the Import payment methods section (this section appears in the lower part of the page after you deploy the Configuration bundle) and click the Request payment methods button:

This will cause X-Payments to return a list of payment methods available for your LiteCommerce store. The payment methods returned by X-Payments will be displayed in the Import payment methods section like this: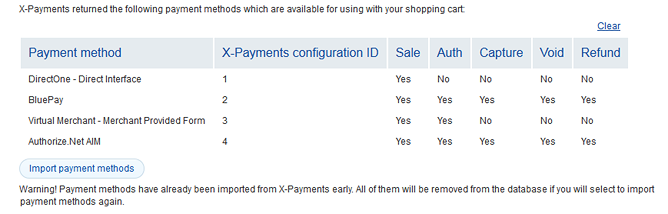
- Review the list of available payment methods returned from X-Payments and, if all is correct, click the Import payment methods button.
The payment methods will be imported. As a result of import, the payment methods will be added to your store's Settings->Payment methods section, and they will be automatically enabled for your customers. You will also see the list of methods that have been imported in the Payment methods section at the top of the X-Payments Connector module configuration page:


After the payment methods have been successfully imported from X-Payments, you can specify whether you wish these methods to use lite interface. Using lite interface means that the form where customers enter their credit card details is included into your store's checkout page like so:

Not using lite interface means that when a customer needs to enter their credit card details to pay for their order, they will be redirected to the site of the payment system through which the payment is going to be processed.
To specify whether lite interface should be used for your X-Payments payment methods, simply select the desired value (Yes or No) from the Use lite interface box opposite each of the payment methods and click the Update interface settings button.
Turn on X-Payments payment methods
After you imported X-Payments payment methods into your LiteCommerce store you need to go to your store admin back-end "Payment settings" page and activate them for your shop checkout routine. Please follow LiteCommerce guidelines on how to enable payment methods in LiteCommerce checkout routine.
See also
|