X-Payments:Managing store connections
- X-Payments:General information
- What's New
- System requirements
- Installation
- Two-factor user authentication
- Configuring X-Payments
- Managing users
- Customizing the interface
- Managing payments
- Unistalling X-Payments
- Upgrading
- Moving X-Payments from one host to another
- Viewing X-Payments logs
- FAQ
- Troubleshooting
- Glossary
- Supported payment gateways
- Popular Payment Methods Configuration Instructions
X-Payments needs to be provided with information about the online store(s) that you wish to use with it. This can be done via the 'Online Stores' page (Settings -> Online stores) in the X-Payments back end.

On X-Payments plans supporting a single online shop integration, this section looks like the following:

To specify your store details, you will need to adjust the following field values:
- Store name: Enter a short name by which this online store will be identified in X-Payments. This name will be used on the 'Payment Configurations' and 'Payments' pages.
- Store title: Enter your store title as you want your customers to see it. The title will appear in the browser tab header to customers using a credit card form shown on a separate page; note that it will not be displayed anywhere if you choose to use a credit card form displayed via iframe (not on a separate page).
- Order prefix: Enter a prefix that will help you to distinguish orders from this online store from other orders in the payment gateway backoffice. The value entered into this field will be used as part of Reference ID for transactions originating at this store.Note: A full transaction Reference ID consists of the online store prefix, the payment configuration prefix and the reference ID (for example, the order ID).
- Template: Specify the payment form template that should be used for the page where the customers of this online store will enter payment information. For instructions on how to edit payment form templates, see the following articles:
After making changes, be sure to click Save.
Once your store details have been specified, you can proceed to connecting your online store to X-Payments. Here we have some X-Payments connection manuals:
X-Payments Cloud
- Using X-Payments Cloud with X-Cart 5
- Using X-Payments Cloud with Magento 2
- Using X-Payments Cloud with Magento 1
- Using X-Payments Cloud with WooCommerce
X-Payments v1.x-3.x
- Connecting X-Payments v1.x-3.x with X-Cart 5
- Connecting X-Payments v1.x-3.x with X-Cart 4
- Using X-Payments v1.x-3.x with Magento 2
- Using X-Payments v1.x-3.x with Magento
- Connecting X-Payments v1.x-3.x with LiteCommerce
- Connecting X-Payments v1.x-3.x with Zen Cart and osCommerce
- Using X-Payments v1.x-3.x with Zoey
In X-Payments Multistore the 'Online Stores' page has more controls allowing you to add and manage multiple stores. You must add all the stores you are going to use with X-Payments to the list of your X-Payments online stores. You will then be able to enable/disable existing stores, view/edit the stores' details and delete the stores you no longer wish to use. See below for instructions on the management of online store connections in X-Payments Multistore:
Contents
Adding an Online store
To add a new store:
- On the 'Online Stores' page (Settings -> Online stores), click Add new. The 'Add new online store' section opens.
X-Payments 3.0: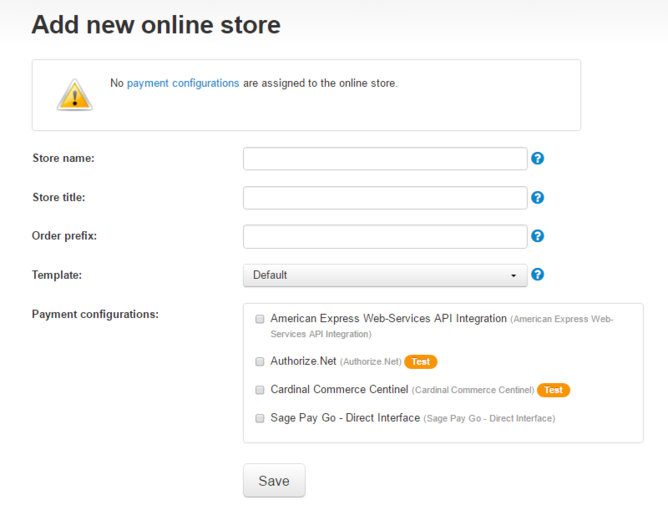
X-Payments 2.0:
- Provide the general information about your store (Store name, Store title, Order prefix, Template) and specify the payment configurations you want to use with it.
- Click Save.


The online store will be created. Once this happens, the page will refresh and you will see the 'Online Store Details' page with the details of the online store you have just added. You can use this page to edit the information you have provided at the previous step and/or obtain the information needed to connect the store in question to X-Payments (i.e. the configuration bundle, store ID and encryption keys; see the instructions for connecting your specific type of online store for more information). Note that when you first add a store in X-Payments, it is added with the Disabled status; before you can get paid by the customers of this store via X-Payments you will need to enable it.
Online Stores List
Online stores added to X-Payments can be viewed and managed on the 'Online Stores' page (Settings -> Online stores). On this page you can see your online stores as a list:

For each store on the list you can see its current status: Enabled or Disabled; stores that have been saved without a payment configuration assigned are marked Not configured (This can be corrected by editing the store's details).
On this page you can:
- Open the details of a specific store for viewing/editing;
- Enable/disable stores;
- Delete stores.
Viewing an Online Store's Details
To view the details of a specific store, click on its name in the list. The 'Online store details' page opens showing all the information related to the store:
X-Payments 3.0:

X-Payments 2.0:

On this page you can:
- View/edit the store's details;
- Enable/disable the store;
- Delete the store.
Note the following important pieces of information that can be obtained on this page:
- Encryption Keys: These are used to ensure the security of communication between your store and X-Payments.
The standard set of encryption keys for each store includes the following:
- the public key used to encrypt data sent to X-Payments from the store;
- the private key used to decrypt data sent from X-Payments to the store;
- the private key password used to decrypt the private key.
To view or re-generate the store's encryption keys, use the View online store encryption keys link at the top of the 'Online Store Details' page. - Store ID and Configuration bundle: These values are generated automatically when you add a new store to X-Payments. They are needed to poperly connect X-Payments to your store. The store ID allows X-Payments to correctly identify requests coming from your store. The configuration bundle is a string that contains a set of X-Payments connection settings.
Enabling/Disabling an Online Store
To enable/disable an online store, do one of the following::
- On the 'Online Stores' page:
X-Payments 2.0 and later: Click the button dropdown element opposite the store name and select the required action (Enable / Disable) from the menu: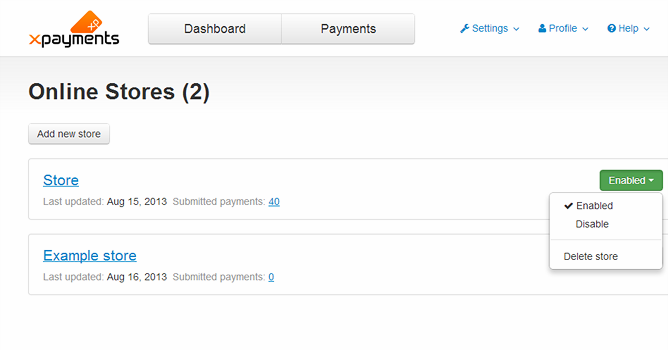
X-Payments 1.0: Click the [ enable ] / [ disable ] link opposite the store name:
- On the 'Online store details' page:
X-Payments 2.0 and later: Click the button dropdown element near the 'Store name' field or at the bottom of the page and select the required action (Enable (and save)/Disable (and save)).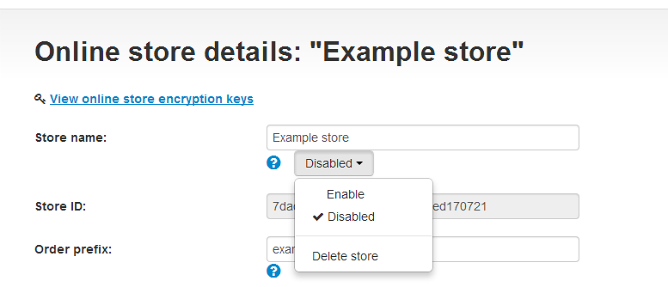
X-Payments 1.0: Click the [ enable ] / [ disable ] link below the 'Store name' field:


Editing an Online Store's Details
To edit information about an online store:
- On the 'Online Store Details' page:
Edit the contents of any editable fields and click Save.
Deleting an Online Store
To delete an online store, do one of the following:
- On the 'Online Stores' page:
X-Payments 2.0 and later: Click the button dropdown element opposite the store name and select the required action (Delete store) from the menu. Confirm the deletion.
X-Payments 1.0: Click the delete icon opposite the store name. Confirm the deletion.
 - On the 'Online store details' page:
X-Payments 2.0 and later: Click the button dropdown element near the 'Store name' field or at the bottom of the page and select the required action (Delete store).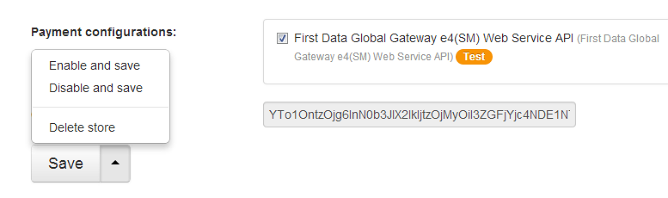
Confirm the deletion.
X-Payments 1.0: Click the Delete store link at the bottom of the page:
Confirm the deletion.


|