X-Payments:3D-Secure settings
- X-Payments:General information
- What's New
- System requirements
- Installation
- Two-factor user authentication
- Configuring X-Payments
- Managing users
- Customizing the interface
- Managing payments
- Unistalling X-Payments
- Upgrading
- Moving X-Payments from one host to another
- Viewing X-Payments logs
- FAQ
- Troubleshooting
- Glossary
- Supported payment gateways
- Popular Payment Methods Configuration Instructions
X-Payments allows you to use 3-D Secure Payer Authentication for a number of payment methods that support it. 3-D Secure provides an additional layer of security for payment transactions via your store by implementing Verified by Visa and MasterCard SecureCode.
Some payment solutions supported by X-Payments provide their own built-in integrated 3-D Secure authentication systems that can be used with X-Payments. Such solutions include:
- PayPal's Payflow Pro;
- PayPal REST API;
- Cardinal Commerce Centinel;
- Elavon (Realex API);
- eProcessing Network - Transparent Database Engine
- Global Iris/HSBC - RealAuth Remote;
- Global Payments (formerly Realex);
- Opayo Direct (formerly Sage Pay Go - Direct Interface);
- PayGate South Africa;
- Worldpay Corporate Gateway - Direct Model.
For many other payment solutions it is possible to use the 3-D Secure authentication solution by CardinalCommerce (X-Payments provides an integrated module for this purpose). Solutions that can be used with 3-D Secure authentication by CardinalCommerce include:
- PayPal Payments Pro,
- Authorize.Net,
- Bambora (Beanstream),
- Beanstream (legacy API),
- Blue Pay Canada (formerly Caledon),
- Chase Paymentech Orbital,
- CyberSource - SOAP toolkit API,
- DIBS,
- ECHO NVP,
- eSELECTplus,
- HeidelPay,
- First Data Payeezy Gateway (formerly Global Gateway e4),
- Netbilling - Direct Mode,
- NMI (Network Merchants Inc.),
- PSiGate XML API;
- USA ePay - Transaction Gateway API;
- WebXpress.
(Since the list of payment gateway integrations supported by X-Payments tends to change with time, we recommend to check with the document X-Payments:Supported payment gateways for information on the type of 3-D Secure system supported by specific payment integrations as it may be more up-to-date than the list above.)
When a customer pays using a payment method with 3-D Secure enabled, in addition to providing their card details they also have to go through an additional authentication step validating that they are actually the cardholder. Depending on the bank and the payment method used, the process will have slight variations. For example, here's what we get in a demo X-Cart 5 store using X-Payments 3.0.x when attempting to pay using a 3-D Secure enabled payment method:

Once we are redirected, we get a page for user authentication like the following:

On this page, we have to submit a password to continue with our payment.
Important: Please be aware that using 3-D Secure requires cardholder data to be stored temporarily by X-Payments. No worries about that - cardholder data is only needed while the transaction is in progress. X-Payments will not store CHD longer than is necessary and will remove the stored CHD for the transactions that have been finalized as often as every few minutes.
So, before you start using 3-D Secure payer authentication with X-Payments, make sure that storage of cardholder data has been enabled in the General_settings section (Settings -> General settings). Also ensure that cardholder data encryption keys have been properly generated.
For payment gateways providing native (built-in) 3-D Secure, no further steps to configure 3-D Secure in X-Payments need to be taken: everything should work automatically as soon as you have properly configured the settings required for 3-D Secure in your account with the respective payment processing provider. To use 3-D Secure payer authentication solution by CardinalCommerce you will, however, need to sign up for the respective service with CardinalCommerce (CardinalCommerce can be contacted at xpayments@cardinalcommerce.com) and implement some further 3-D Secure related configuration in X-Payments. For instructions, see the appropriate section below:
Once you have everything configured to start using 3-D Secure, it is a good idea to run a couple of test transactions to make sure it works as expected. To run transactions through 3-D Secure in test mode, some preparation will be needed:
- Check with the documentation or customer service of your payment gateway what needs to be done to run transactions in test mode. Depending on the payment system, you may have to set up a separate testing account, or adjust some settings in your existing account. Make sure 3-D Secure is enabled for the account you will use for testing.
- In X-Payments, set your payment method to work in test mode. For some payment gateways this means that you will just need to switch the test/live setting on the respective 'Payment configuration details' page; for others, you will have to use a testing account (different from your production account), so the settings with your account access details will need to be changed as well.
- Check with the documentation or customer service of your payment gateway whether you will need to use any test mode specific data for your test transactions. For example, some payment gateways may require that you use a special credit card number, have a certain transaction total or use some other information that will allow the gateway to identify the transaction as being run for testing purposes. Some payment gateways will have additional requirements for the use of 3-D Secure in test mode (like Worldpay Corporate - which requires you to specify the cardholder name for your test transactions as "3D" to enable 3-D Secure for them). It is always best to check with the customer service what data is required.
Managing your 3-D Secure system configuration in X-Payments 2.1 or later
To configure X-Payments to use 3-D Secure payer authentication via CardinalCommerce:
- Add and enable 3-D Secure for each payment configuration in your X-Payments installation that needs to use 3-D Secure via CardinalCommerce.
- In the details of all the online stores that will be using your 3-D Secure enabled payment configuration, specify the template that should be used for the 3-D Secure payer authentication step.
To add and enable 3-D Secure for a payment configuration:
- Go to the 'Payment Configurations' page (Settings -> Payment configurations) and locate the payment configuration for which you want to enable 3-D Secure payer authentication via CardinalCommerce. Click on the "3-D Secure: CardinalCommerce" link for this payment configuration. For example, if we want to configure 3-D Secure payer authentication for Authorize.Net AIM, we need to select this link:
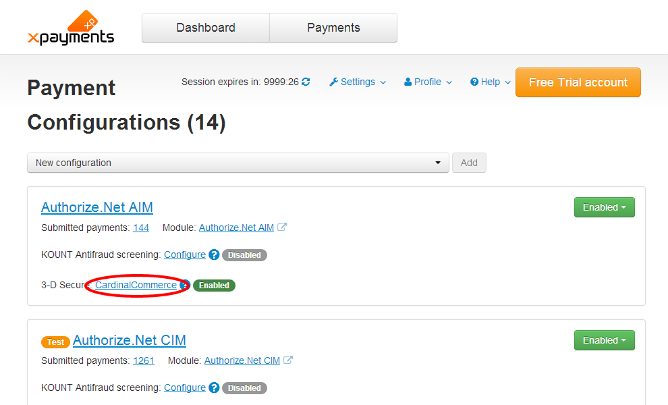
A page titled 'CardinalCommerce 3D-Secure configuration settings' opens: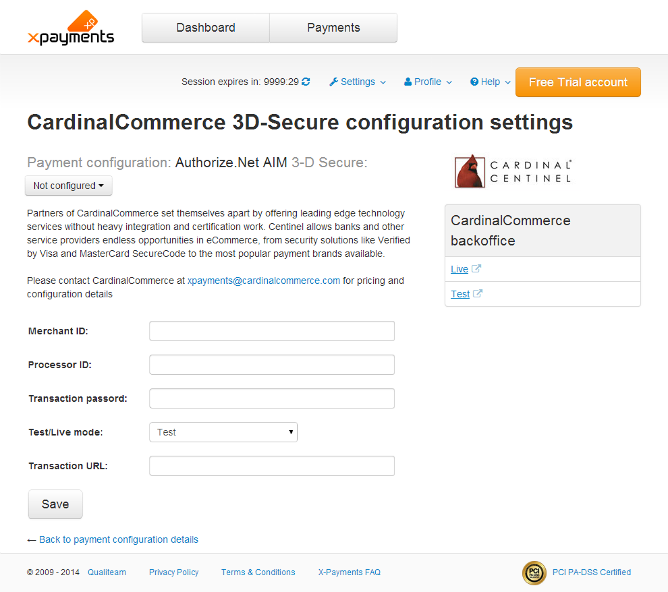
- Use the 'CardinalCommerce 3D-Secure configuration settings' page to provide your CardinalCommerce module configuration settings for the selected payment configuration:
- Adjust the following fields:
- Merchant ID: The MerchantID value provided to you by CardinalCommerce.
- Processor ID: The ProcessorID value provided to you by CardinalCommerce.
- Transaction password: The Transaction password provided to you by CardinalCommerce.
- Test/Live mode: The mode in which you wish to use 3-D Secure (Test or Live).
- Transaction URL: The TransactionURL provided to you by CardinalCommerce. The transaction URL for testing purposes is https://centineltest.cardinalcommerce.com:443/maps/txns.asp.
- When you are done adjusting all the fields, click Save to save the changes.
The 3-D Secure system configuration will be created.
- Adjust the following fields:
- Enable the 3-D Secure system configuration you have created: On the 'CardinalCommerce 3D-Secure configuration settings' page for your selected payment configuration, click the Disabled button located next to the title "Payment configuration: <Payment configuration name> 3-D Secure", and select the action Enable from the button menu:
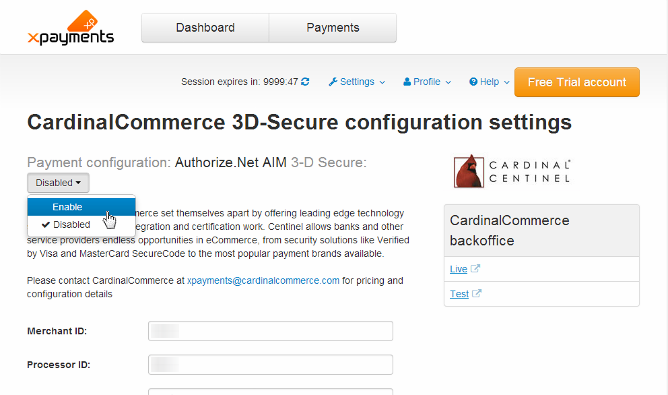
This will enable 3-D Secure payer authentication via CardinalCommerce for the selected payment configuration.


The status of 3-D Secure payer authentication service for any payment configuration can be found on the 'Payment configurations' page (Settings -> Payment configurations):

or on the 'Payment configuration details page:

To disable/re-enable 3-D Secure for a payment configuration:
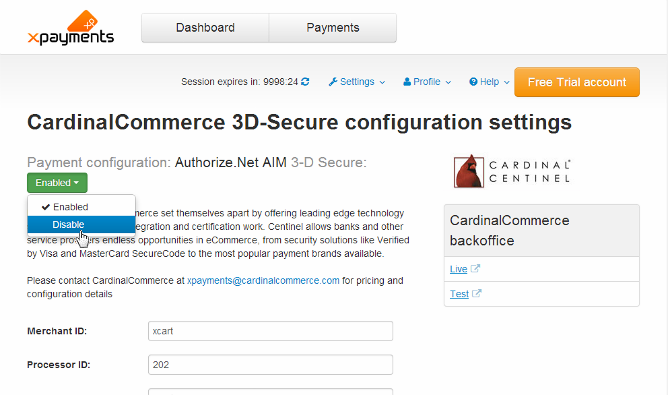
- Go to the 'Payment Configurations' page (Settings -> Payment configurations) and locate the payment configuration for which you want to disable/re-enable 3-D Secure payer authentication via CardinalCommerce. Click on the "3-D Secure: CardinalCommerce" link for this payment configuration. This opens the 'CardinalCommerce 3D-Secure configuration settings' page.
- Use the action button located at the top of the page next to the title "Payment configuration: <Payment configuration name> 3-D Secure" to select the action you require (Disable/Enable):

To specify the template that should be used in a specific store for 3-D Secure checks:
- Go to the 'Online Stores' page (Settings -> Online stores), click on the name of the store for which you want to set the template that should be used for the 3-D Secure payer authentication step.
- On the page that opens, select the template you require from the Template for 3-D Secure check box:
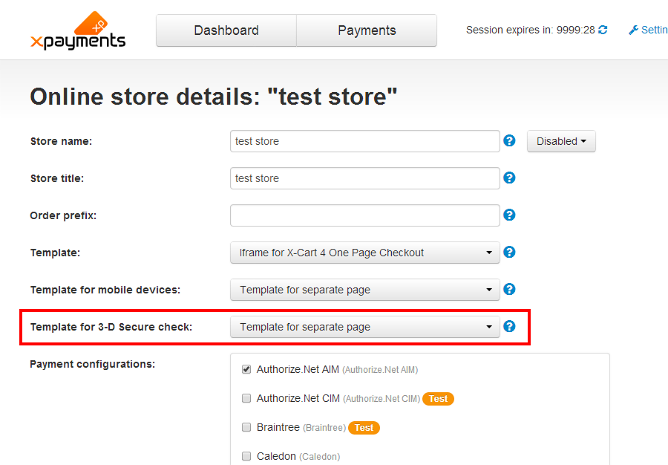
- Click Save at the bottom of the page to save the changes.

Managing your 3-D Secure system configuration in X-Payments 1.0 or 2.0
To configure X-Payments to use 3-D Secure payer authentication via CardinalCommerce:
- Add a 3-D Secure system configuration for the CardinalCommerce module.
- Enable your CardinalCommerce 3-D Secure system configuration.
- Assign your CardinalCommerce 3-D Secure system configuration to the payment configuration for which you want to use 3-D Secure.
To add a 3-D Secure system configuration for the CardinalCommerce module:
- On the '3D-Secure Settings' page (Settings -> 3-D Secure settings), click Add new next to New configuration for: CardinalCommerce.
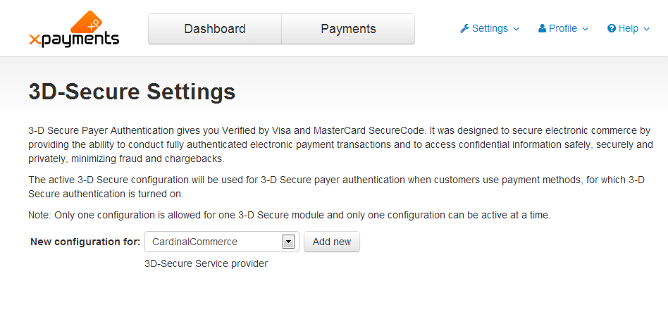
A page titled 'Add new 3D-Secure configuration' will be opened displaying the dialog box for providing your CardinalCommerce module configuration settings: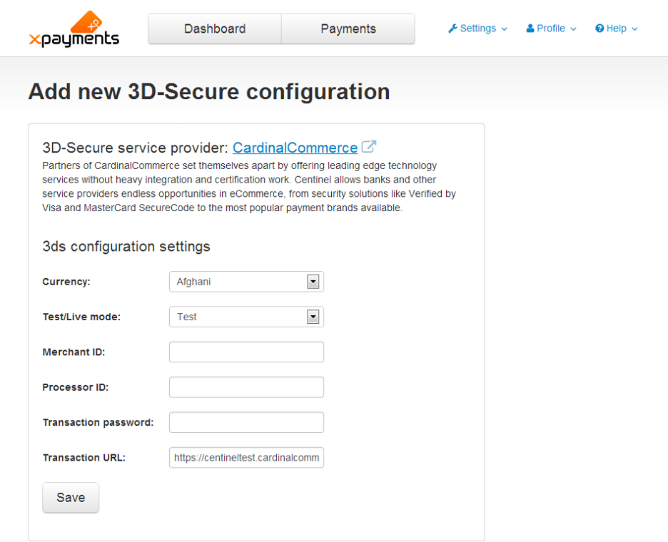
- Adjust the configuration settings for CardinalCommerce module:
- Currency: The currency your online store uses to conduct transactions.
- Test/Live mode: The mode in which you wish to use 3-D Secure (Test or Live).
- Merchant ID: The MerchantID value provided to you by CardinalCommerce.
- Processor ID: The ProcessorID value provided to you by CardinalCommerce.
- Transaction password: The Transaction password provided to you by CardinalCommerce.
- Transaction URL: The TransactionURL provided to you by CardinalCommerce. The transaction URL for testing purposes is https://centineltest.cardinalcommerce.com:443/maps/txns.asp.
- When you are done adjusting all the fields, click Save to save the changes.


That is all, you have just added your 3-D Secure system configuration. Now you need to enable it and assign it to the payment configuration or which you want to use 3-D Secure.
After a 3-D Secure system configuration has been added, you can see it on the '3-D Secure Settings' page:

The following actions are available:
- View/edit the configuration details;
- Enable/disable the configuration;
- Delete the configuration.
To view/edit the details of your 3-D Secure system configuration:
- On the '3-D Secure settings' page: Click on the name of the configuration (CardinalCommerce). The page showing the configuration details will be opened. If necessary, adjust the settings and click Save.
To enable/disable your 3-D Secure system configuration:
- On the '3-D Secure settings' page:
X-Payments 2.0 and later: Click the button dropdown element opposite the configuration name and select the required action (Enable / Disable) from the menu.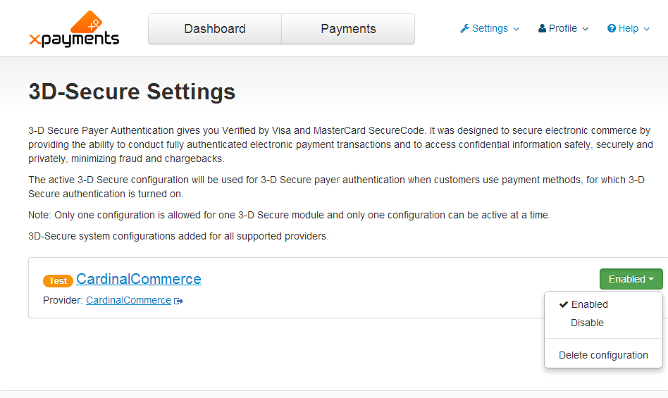
X-Payments 1.0: Click the [ enable ] / [ disable ] link opposite the configuration name. - On the '3-D configuration: <configuration name>' page:
X-Payments 2.0 and later: Click the button dropdown element near the configuration name and select the required action (Enable/Disable).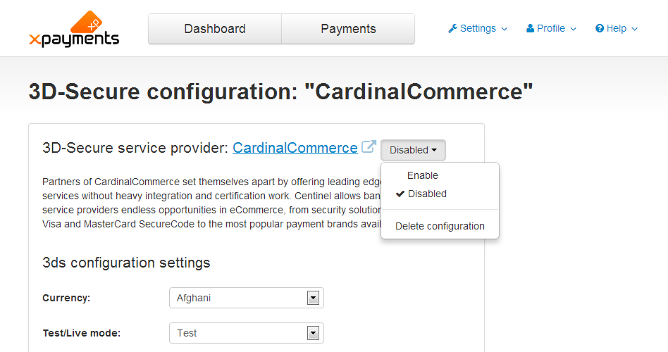
X-Payments 1.0: Click on the 'Configuration is active [ make inactive ] / 'Configuration is inactive [ make active ] link.


To delete your 3-D Secure system configuration:
- On the '3-D Secure settings' page:
X-Payments 2.0 and later: Click the button dropdown element opposite the configuration name and select the required action (Delete configuration) from the menu.
X-Payments 1.0: Click the delete icon opposite the configuration name.
 - On the '3-D configuration: <configuration name>' page:
Click on the Delete configuration link at the bottom of the page. Confirm the deletion.
To assign your 3-D Secure system configuration to a payment configuration:
- Locate the payment configuration to which you want to assign your 3-D Secure system configuration, open its details for viewing|editing, enable the option Use external module (CardinalCommerce) and save the changes.Note: The setting 'Use external module (CardinalCommerce)' appears on the payment configuration page only after steps 1-3 of the 'add a 3-D Secure system configuration' procedure have been properly completed.
|