X-Payments:Managing users
- X-Payments:General information
- What's New
- System requirements
- Installation
- Two-factor user authentication
- Configuring X-Payments
- Managing users
- Customizing the interface
- Managing payments
- Unistalling X-Payments
- Upgrading
- Moving X-Payments from one host to another
- Viewing X-Payments logs
- FAQ
- Troubleshooting
- Glossary
- Supported payment gateways
- Popular Payment Methods Configuration Instructions
X-Payments root admin can create additional user accounts to allow access to the X-Payments back end to other users.
Unlike root admin who has full access to X-Payments functionality, non-root X-Payments users have limited privileges:
- can edit their own user name, email address and password;
- (X-Payments 2.2 and earlier) can generate PIN codes for personal use;
- (X-Payments 3.0 and later) can choose and configure one or more methods of two-factor user authentication for personal use;
- may have access to payment details / cardholder data / subscriptions - if the respective permissions have been given to them by the root admin;
- may view/edit X-Payments' general settings / online stores list and details / payment configurations / 3D Secure settings - if the respective permissions have been given to them by the root admin;
- cannot add/manage other user accounts;
- cannot access cardholder data encryption keys.
Contents
Adding a New User Account
To add a new user account:
- In the X-Payments back end, go to the 'Users List' page (Settings -> Users).
- Click the Add user button. The 'Create new account' page opens.
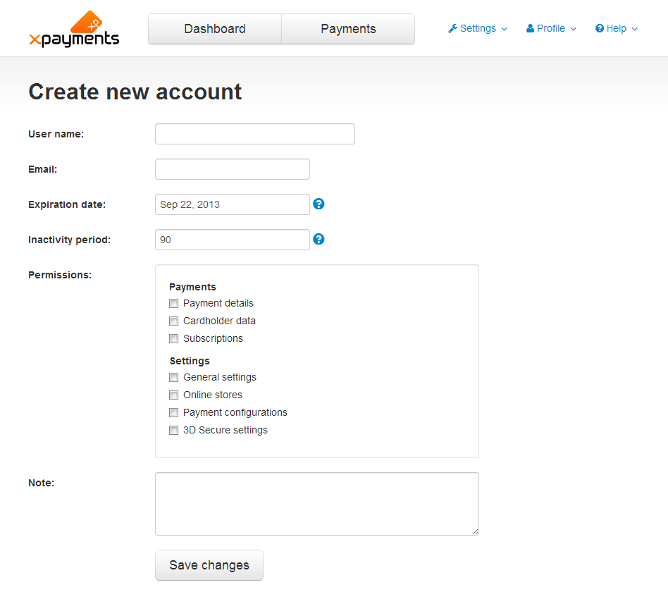
- Complete the following fields:
- User name: Enter a name by which the user will be identified in X-Payments.
- Email: Enter the user's email address. This will be used for various notifications as defined on the 'General settings' page.
- Expiration date: If you want the user account to be automatically deactivated after a certain period of time, enter the account expiration date; for example, Sep 10, 2010. After this date the account will be locked with the status Locked due to account expired. You will be able to unlock the user by changing the account expiration date. You can leave the field empty to create an account that never expires. It is possible to enable email notifications for users whose account is about to expire (See the 'Account expires' setting in 'General settings/Email Notifications').
- Inactivity period: Enter the number of days of account inactivity (not logging in, etc) after which the account will be locked. After the specified number of days of inactivity the user account will be locked with the status Locked due to account inactivity. Recommended values are 1 to 90; if a number outside this range is used, the defined 'Inactivity period' value will be ignored, and the account will be locked automatically after 90 days. Inactivity period is counted from the moment the user last logged in or, if the user never logged in, from the time of account creation. It is possible to enable email notifications for users whose account is about to be locked due to user inactivity (See the 'Account is locked due to user inactivity' setting in 'General settings/Email Notifications').
- Permissions: Set user permissions for the user account being created by selecting the sections of the X-Payments back end to which you want the new user to have access.
- Note: (Optional) Enter a comment for yourself regarding the user account being created. The comment will not be visible to the user.
- Click Save changes. The user account is created. An email notification is sent to the account owner.
After you have clicked Save changes, the page will refresh and you will see the 'Account details: <user name>' page with the details of the user account you have just added. You can use this page to edit the account details.

Note that after a user accounts is created, it needs to be activated by the account owner. User accounts that have not yet been activated have the status Waiting for email activation. To activate their newly created user account, a user must use the account activation link provided in the 'account created' notification message sent to their email address. After clicking on this link the user will be prompted to set their password for access to the X-Payments back end. After successful account activation, the status of the user account in X-Payments will be updated to Active.
Users List
Existing user accounts can be viewed and managed on the 'Users List' page (Settings -> Users):

For each user account on the list you can see its current status. The possible account statuses are as follows:
- Full permissions: This is the permanent status used for the X-Payments root admin. It cannot be changed nor assigned to any other user in X-Payments.
- Active: This is the normal working status of a user account; it means that the user can log in to the X-Payments back end and perform actions within the permissions scope defined by their account details. The 'Active' status is set for all user accounts automatically after account activation / email address change confirmation by the user; it can also be assigned to a user account manually by the root admin after the account was locked (see the instructions for changing the account status below).
- Waiting for email activation: This is an automatic status; it is used for newly created user accounts before account activation by the account owner.
- Waiting for email verification: This is an automatic status; it is used for user accounts for which registration email address has been changed by the X-Payments root admin, but the change has not yet been confirmed by the account owner.
- Waiting for password recovery: This is an automatic status; it is used for user accounts for which password recovery has been requested.
- Locked due to account inactivity: This is an automatic status assigned to a user account after the expiration of the account inactivity period, as provided by the user account details (see the instructions for Changing a User's Account Status).
- Locked due to danger activity: This is an automatic status temporarily assigned to a user account for which repeated failing login attempts are detected (related to the 'Dangerous activity blocking period (minutes)' option in X-Payments General settings).
- Locked due to account expired: This is an automatic status assigned to a user account after the account expiration date, as provided by the user account details. To unlock a user account in this state, X-Payments root admin must change the 'Expiration date' value in the account details.
- Locked by administrator: This is a status that can be used to temporarily disable a user account; it can be set manually by the X-Payments root admin (see the instructions for Changing a User's Account Status).
On this page you can:
- Open the details of a specific user account for viewing/editing;
- Lock active user accounts / unlock user accounts with the Locked by administrator, Locked due to danger activity and Locked due to account inactivity status;
- Delete user accounts.
Viewing a User's Account Details
To view the details of a specific user account, click on the user name in the Users List. The 'Account details: <user name>' page opens showing all the information related to the user account:

On this page you can:
- View/edit the user account details (user name, email address, expiration date, inactivity period, user permissions, etc);
- Change the user account status (lock the account if it is active / unlock the account if it is locked);
- Delete the user account.
Editing a User's Account Details
The 'Account details: <user name>' page allows you to edit the details of a specific user account.
To edit such details as user name, expiration date, inactivity period, user permissions and comment about the user, simply edit the contents of the respective fields and click Save.
To change the user's email address:
- Click on the 'Change user email' link:

The 'Change user email' box will be expanded providing a field where you can enter a new email address: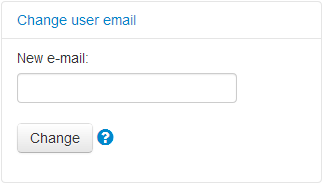
- Use the New e-mail field to enter a new email address.
- Click Change.
After you click the Change button, a notification will be sent to the email owner with a confirmation link. The user will need to click on this link to confirm the change of the email address. The email address stored in the user account details will be updated only after the confirmation. Until that time the email address in the user's account details will be displayed like so:
<old email address>
will be changed to <new email address>

Changing a User's Account Status
The current status of a user account is visible on the 'Users List' page:

and on the 'Account details: <user name>' page:

To change the status of a user account, do one of the following:
- On the 'Users List' page:
X-Payments 2.0 and later: Click the button dropdown element opposite the user name and select the required action (Lock / Unlock) from the menu: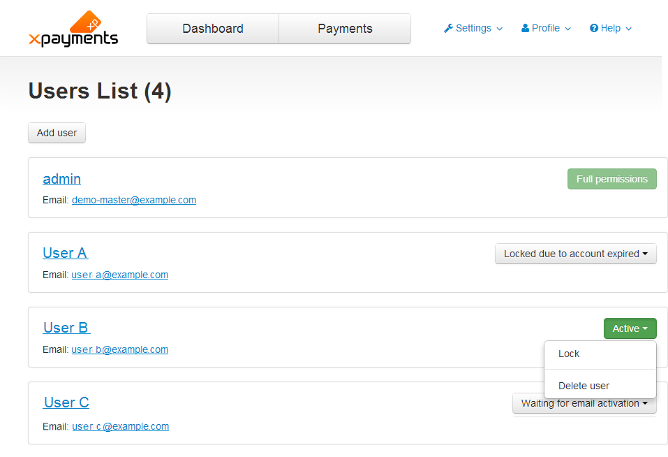
X-Payments 1.0: Click the [ lock ] / [ unlock ] link opposite the user name:
- On the 'Account details: <user name>' page:
X-Payments 2.0 and later: Click the button dropdown element at the bottom of the page and select the required action (Lock account/Unlock account):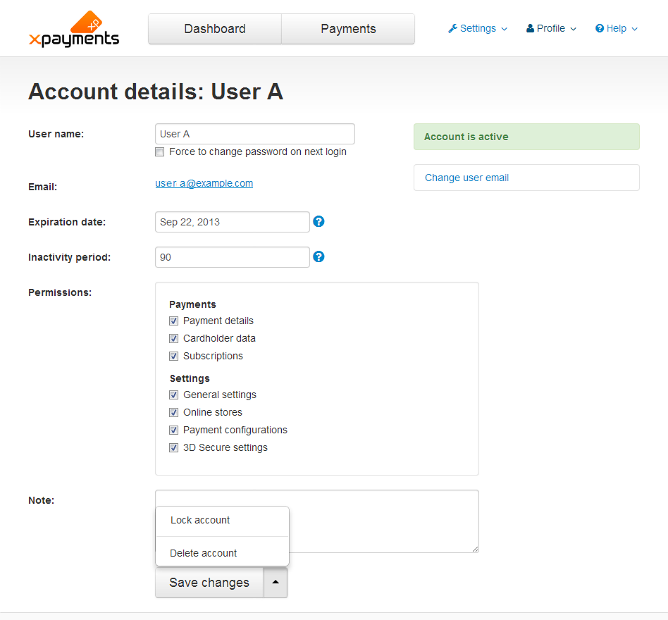
X-Payments 1.0: Click the Lock account / Unlock account button below the account status:


Requesting Password Change for a User Account
There may be times when you will want to request that one or more users of your X-Payments installation change their X-Payments password(s).
To request password change:
- On the 'Account details: <user name>' page:
X-Payments 2.0 and later: Select the Force to change password on next login check box and click Save changes.
Deleting a User Account
To delete a user account, do one of the following:
- On the 'Users List' page:
X-Payments 2.0 and later: Click the button dropdown element opposite the user name and select the required action (Delete account) from the menu. Confirm the deletion.
X-Payments 1.0: Click the delete icon opposite the user name. Confirm the deletion.
 - On the 'Account details: <user name>' page:
X-Payments 2.0 and later: Click the button dropdown element at the bottom of the page and select the required action (Delete account). Confirm the deletion.
X-Payments 1.0: Click the 'Delete account' link:
Confirm the deletion.

|