X-Payments:Managing payments
- X-Payments:General information
- What's New
- System requirements
- Installation
- Two-factor user authentication
- Configuring X-Payments
- Managing users
- Customizing the interface
- Managing payments
- Unistalling X-Payments
- Upgrading
- Moving X-Payments from one host to another
- Viewing X-Payments logs
- FAQ
- Troubleshooting
- Glossary
- Supported payment gateways
- Popular Payment Methods Configuration Instructions
Payments Page
Payments made via X-Payments can be viewed/managed using the 'Payments' page.
On the 'Payments' page, the list of payments is presented in the form of a table:

For each individual payment the following information is available:
- Reference ID - the payment's reference number;
- Payment ID - the payment's ID number;
- Submitted - when the payment was submitted;
- Online store - the online store from which the payment originated;
- Status - the payment status (See Payment Statuses for more information);
- Last update - the last time that the payment was updated;
- Amount - the payment amount;
- Payment configuration - the payment configuration that was used to accept the payment;
- Customer IP - the IP address of the customer who made the payment;
You will see only some of the above information because the 'Payments' table can display no more than six columns simultaneously. To change the set of visible columns in the 'Payments' table:
- Click on the 'Settings' icon in the top right hand corner of the table:
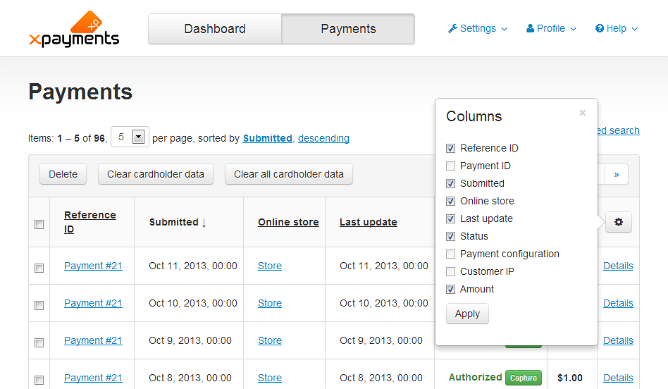
- Unselect the check boxes for the columns you do not need; then, select the check boxes for the columns you want enabled.
- Click Apply.

It is possible to change the payments' sort order. To change the way the payments are sorted, simply click on the table column headers.
It is possible to filter payments / find specific payments based on certain criteria. See Filtering payments / Advanced search
On the 'Payments' page you can:
- Open the details of a specific payment for viewing;
- Clear cardholder data for some or all payments (Note: The user does not have to have the permission to view cardholder data to be able to clear cardholder data);
- Delete payments.
Payment Statuses
The 'Status' column of the 'Payments' table shows payment statuses. The possible payment statuses are as follows:
- New - The payment has been initiated, but the result is not known yet (for example, response from the payment gateway has not been received).
- Authorized - The money in the customer's account has been placed on hold to ensure the availability of funds for capture.
- Charged - The payment amount has been moved from the customer's account to the merchant's account.
- Refunded - The payment has been returned to the customer.
- Partially refunded - The payment has been partially returned to the customer.
- Declined - The payment has been declined (The payment gateway declined the transaction or cancelled the payment authorization, or the customer refused to complete the payment).
Filtering payments / Advanced search
X-Payments allows you to filter the 'Payments' table to find specific payments based on certain criteria:
- X-Payments 2.0 and later: Click the
 link above the Payments table. In X-Payments 1.0, use the link
  .
.
The 'Advanced search' form opens: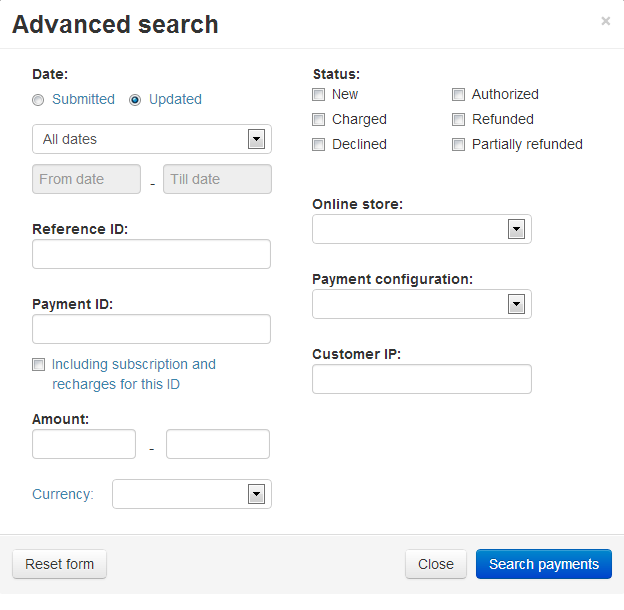
- Use the 'Advanced search' page to provide your search criteria:
- Date: Select whether the payments should be submitted or updated during the dates you specify below. You can select from 'All dates', 'Day', 'Week', 'Month', 'Year' or 'Specified period. If you select 'Specified period, enter the exact dates below.
- Payment ID: Enter the ID of the payment you want to be displayed.
- Reference ID: Reference ID is passed from the shopping cart. It identifies the order, for which this payment is made, on the side of the shopping cart.
- Status: Select the check boxes next to payment statuses you want to be displayed.
- Amount: Enter the amount of payments you want to be displayed and select the currency in the third selectbox.
- Online store: Select which store the payments should come from.
- Payment configuration: Select the payment configuration, used for payments you want to be displayed.
- Customer IP: Enter the IP address of the customer, whose payments you want to be displayed.
- Click Search payments. The 'Advanced search' form disappears. Now you should be able to see a list of payments filtered according to the search criteria you provided.

To clear the 'Advanced search' form and start over:
- X-Payments 2.0 and later: Use the Reset form button at the bottom of the form.
- X-Payments 1.0: Use the
 link.
link.
Viewing Payment Details
To view the details of a specific payment, locate the payment in the 'Payments' table and click on its Reference ID, or click on the 'Details' link pertaining to the payment in the last table column on the right. The 'Payment details' page opens:

The main section of the 'Payment details' page contains general information about the payment.
Below there is the 'Transaction list' section that displays all the transactions pertaining to this payment.
You may see the following types of transactions:
- Auth: Transaction to place a pending charge or hold on the customer's payment account.
- Capture: Transaction to capture a previously authorized payment amount - fully or partially. Transactions of this type are the result of the merchant using manual capture in a two-step payment flow (See Auth and capture: Capturing funds).
- Sale: Transaction to authorize and automatically capture a payment amount (authorization and capture actions are completed simultaneously).
- Void: Transaction to void a previous authorization.
- Refund - Transaction to return a previously received payment amount from the merchant to the customer - fully or partially.
- Info - Transaction to obtain information about the current status of handling the payment from the payment gateway.
For example, the image below displays a list of transactions for a payment that was partially refunded. First the payment amount was charged, then a part of the amount was refunded:

To see detailed information on a specific transaction:
- X-Payments 2.0 and later: Click
 . You will see something like the following:
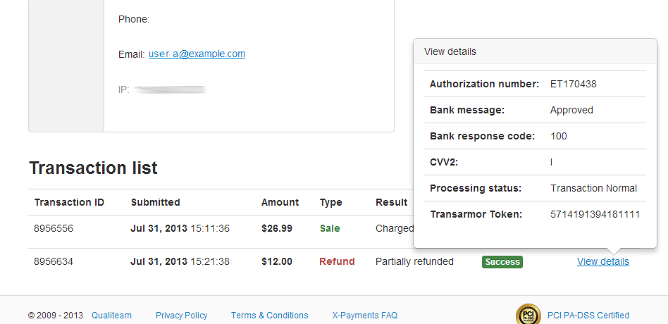 .
.
If there is stored cardholder data associated with the payment, users who have the permission to view cardholder data can see it in a separate section on the right-hand side of the screen. If no stored cardholder data is available, the section is displayed like so:
- X-Payments 1.0: Click
 . You will see something like the following:
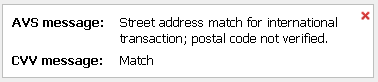


Deleting payments
To delete a payment, do one of the following:
- On the 'Payments' page:
Select the payment(s) you wish to delete and click the Delete button. - On the 'Payment details' page:
X-Payments 2.0 and later: Click the link. Confirm the deletion.
X-Payments 1.0: Click the link. Confirm the deletion.
Clearing cardholder data
Stored cardholder data for some or all payments can be removed via the 'Payments' page: To remove cardholder data for specific payments, select the check boxes next to them and click the Clear cardholder data button. To remove all stored cardholder data, click the Clear all cardholder data button.
It is also possible to remove stored cardholder data for a specific payment via the 'Payment details' page of that payment: click the Clear cardholder data link in the section that displays stored cardholder data.
Auth and capture: Capturing funds
Depending on the type of order fulfillment process used by your store, you may choose to set up your account in such a way that the capture of funds from your buyers' accounts will not happen automatically at the time of payment processing, but will be delayed so you can capture the funds manually at a later time (You will need to ensure that your preferred payment gateway supports this feature).
To enable manual capture transactions in X-Payments, you will need to adjust your payment configuration settings accordingly:
- Go to the 'Payment configurations' page (Settings -> Payment configurations) and select the payment configuration for which you need to enable manual capture.
- On the 'Payment configuration details' page, set the Initial transaction to Auth:

Choosing Auth ensures that, when a customer makes a payment, the payment amount will be authorized, but not captured - until the time you decide to capture funds manually.Note: In the case of Auth and capture, the authorization is immediately followed by automatic capture, so you will not be able to capture funds manually.

To capture funds after the initial 'Auth' transaction:
- On the 'Payments' page, locate the payment for which you want to capture funds and open its details for viewing. The 'Payment details' page opens.
- On the 'Payment details' page, locate the section for Capture/Void actions:
X-Payments 2.0 and later: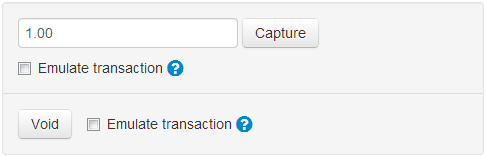
X-Payments 1.0: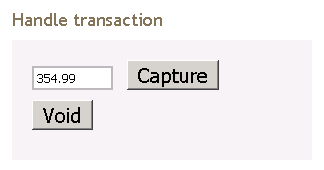
- Make sure that the amount shown in the input box is correct. If you need to capture a partial amount, adjust the contents of the input box accordingly - only the specified amount will be captured.
- Click Capture.


If your payment gateway supports multiple capture transactions, you can capture funds several times, gradually decreasing the authorized amount.
You can also capture funds (the whole amount) directly from the 'Payments' page. To capture funds for a payment, simply click on the Capture link next to the payment status:
X-Payments 2.0 and later:

X-Payments 1.0:

If funds are not available for capture, the Capture button disappears.
Voiding authorizations
Depending on the payment gateway you use, you may be able to void authorizations.
To void an authorization:
- On the 'Payments' page, locate the payment for which you want to void an authorization and open its details for viewing. The 'Payment details' page opens.
- On the 'Payment details' page, locate the section for Capture/Void actions:
X-Payments 2.0 and later: - Click Void.
X-Payments 1.0:
Note that once an authorization has been voided, you will no longer be able to capture the payment - it will be declined.
Issuing refunds
Depending on the payment gateway you use, you may be able to refund payments received from your customers - fully or partially.
To issue a refund:
- On the 'Payments' page, locate the payment for which you want to make a refund and open its details for viewing. The 'Payment details' page opens.
- On the 'Payment details' page, locate the section for Refund actions:
X-Payments 2.0 and later:
- Click Refund.

ATTN users of Authorize.Net CIM:
- Users of X-Payments versions prior to X-Payments 2.2.0 may find that they are unable to issue refunds for some Authorize.Net CIM transactions. This is typically the case for transactions that have not yet been submitted for settlement. It is normal because for Authorize.Net CIM transactions funding takes place after settlement; before settlement no money can be returned to the buyer since no money has yet been captured. After settlement, the issue resolves on its own. In X-Payments 2.2.0 we implemented "smart refunds": if a refund transaction cannot be completed successfully, we automatically attempt to void the initial transaction.
- To ensure the correct processing of Authorize.Net CIM refunds, you need to make sure that the option selected in the "Expanded Credit Capabilities" setting in the payment configuration for Authorize.Net CIM in X-Payments matches the respective setting in your merchant account. More information on Expanded Credit Capabilities (ECC) is available here: https://account.authorize.net/help/Miscellaneous/Pop-up_Terms/Expanded_Credit_Capabilities.htm
Accept/Decline: Managing High Risk Transactions
Some payment gateways provide merchants with fraud protection tools that allow them to identify potentially fraudulent transactions and manage their own fraud risk – to make their own decisions about which payments to accept or decline.
For example, some payment solutions by PayPal allow the merchant to set up Fraud Protection filters which make it easier for the merchant to detect and respond to fraudulent transactions. Depending on the merchant's preferences, the transactions identified as having a higher likelihood of risk can be rejected or held pending for review by the merchant so the merchant can explicitly accept or deny the payment.
X-Payments supports this feature for some payment gateway integrations (See Supported payment gateways, "Accept" and "Decline" columns).
When a transaction is identified as high-risk by the payment gateway, the payment gets the Authorized with warning/Charged with warning status in X-Payments:

The following section appears on the 'Payment details' page for the payment:

You can use the Accept and Decline buttons in this section to specify whether you want to accept or decline the transaction.
If the transaction is accepted, the payment status is updated from Authorized with warning or Charged with warning to simply Authorized or Charged. If the transaction is declined, the payment becomes Declined.
Emulating transactions
Sometimes a situation may occur when you need to change the status of a payment in X-Payments without actually completing the respective transaction via the payment gateway. For example, you may need to "mark" a payment as captured when you know that the funds have been successfully moved to your account, but the information about the payment status change was not sent to X-Payments (i.e., X-Payments did not receive a callback request from the payment gateway - because the payment gateway does not support this feature or was down). In this case, you should use the 'Emulate transaction' feature. As a result, the transaction status will be updated in X-Payments - without the information being sent to the payment gateway. The information about the transaction status change will also be sent to the online store, and - provided that the online store supports this feature (X-Cart does) - the order status in the store will be automatically updated as well.
To emulate a transaction:
X-Payments 2.0 and later:
- On the payment details page, locate the section for Capture/Void/Refund actions: or
- Make sure that the amount shown in the input box is correct. If you need to use a partial amount, adjust the contents of the input box accordingly - the transaction will be completed only for the specified amount (NB: Your payment gateway must support partial transactions!).
- Capture/Refund transactions: Select the Emulate transaction check box below the input box.
Void: Select the Emulate transaction check box next to the Void button. - Click the transaction action button (Capture, Refund or Void).
X-Payments 1.0:
- On the payment details page, click the Emulate transaction link. The 'Emulate transaction' section opens:
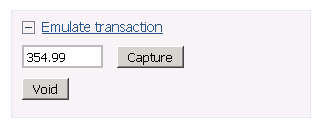
- Make sure that the amount shown in the input box is correct. If you need to use a partial amount, adjust the contents of the input box accordingly - the transaction will be completed only for the specified amount (NB: Your payment gateway must support partial transactions!).
- Click the transaction action button (for example, Capture).

Tokenization and Re-Use of Saved Credit Cards (X-Payments 2.x and later)
In this section:
- Tokenization: Overview
- Enabling Payments with Saved Credit Cards
- Tokenization related configuration for Authorize.Net CIM by Authorize.Net / QuickBooks Payments by Intuit Inc
- Charging Saved Credit Cards
- Viewing Payments Made with Saved Credit Cards
- Managing Subscriptions
- Get/update tokenized card feature
Tokenization: Overview
As an online merchant, you might like the idea of enabling your customers to save a credit card for repeated use at your store. If you have returning customers or want to sell subscriptions, this certainly makes sense, as this way credit card details will have to be entered and saved just once, and you won't have to ask your customers for their payment details every time they need to make a purchase.
However, according to PCI DSS, an industry-wide standard that must be met by any organization that stores, processes, or transmits cardholder data, storing customers' credit card details is not allowed for regular merchants - unless they take steps to implement a number of security aspects and undergo an expensive and time-consuming process of certification to ensure that all the PCI DSS requirements have been thoroughly met.
X-Payments versions 2.x and later provide a PCI DSS compliant solution that allows you to charge customer credit cards again (for new orders or for subscriptions) when you use certain payment gateways. You get all the benefits of storing your customers' credit card details - without actually storing them on your system. This is made possible through the use of the so-called "tokenization". Tokenization is a means of protecting sensitive cardholder data that was designed to reduce the risks associated with storing credit card information for merchants. The technology is meant to prevent the theft of the credit card information in storage. It replaces your customer's credit card details with a special number (token) that can be used to charge again the customer’s credit card via an integrated payment gateway. As sensitive information is stored not on the merchant site, but in a secure PCI DSS compliant environment of the payment system, use of tokenization significantly simplifies PCI DSS compliance for the merchant.
Support for tokenization and re-use of saved credit card data stored in a secure data center of the payment system away from the merchant site are new features introduced in X-Payments 2.0 (supported by all later X-Payments versions; not supported by X-Payments 1.x).
These features are supported by:
- X-Cart versions 4.1.0 and later (Important: Installation of the updated X-Payments connector module is required for X-Cart versions 4.1.0-4.6.0. As to X-Cart versions 4.6.1 and later, they already support tokenization and re-use of saved credit cards out of the box, but for X-Cart versions 4.6.1-4.6.3 we still recommend installing the updated connector module so you can get the many fixes and improvements of the updated version.)
- Magento Community edition 1.6 or later; Magento Enterprise.
To find out whether a specific payment gateway integrated with X-Payments supports tokenization, see the list of Supported payment gateways for X-Payments.
Enabling Payments with Saved Credit Cards
To enable payments with saved credit cards, do the following:
- Ensure that you are using an X-Payments integrated payment method with support for tokenization.
- In X-Cart Admin area, open the payment method's configuration page, select the Use for recharges check box and click Update:
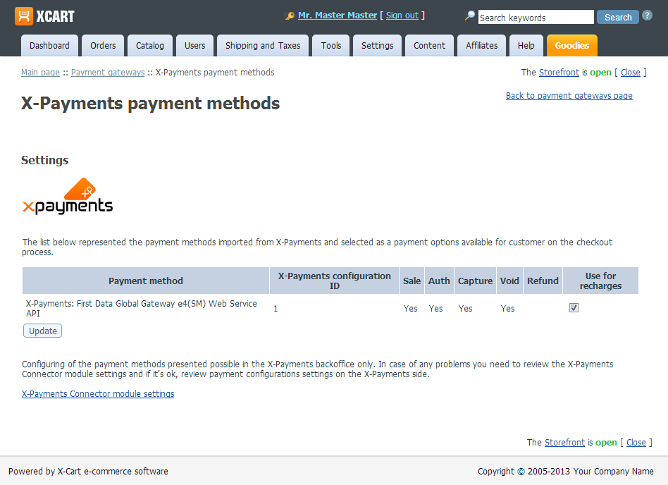
- Go to the 'Payment methods' page. You should see a new payment method added to the list - Use saved credit card:
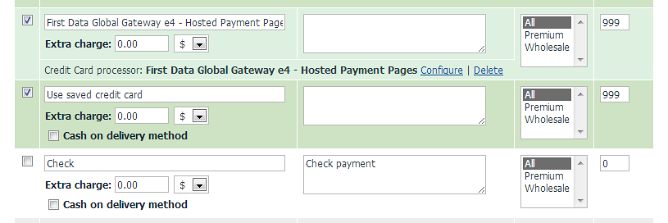
- Configure the Use saved credit card method as needed. For example, you can edit the name of this payment method, set an extra charge fee or make this payment method available only to users with a specific membership.
- Make sure the Use saved credit card method is enabled.


This is all. Now your store has some exciting new features:
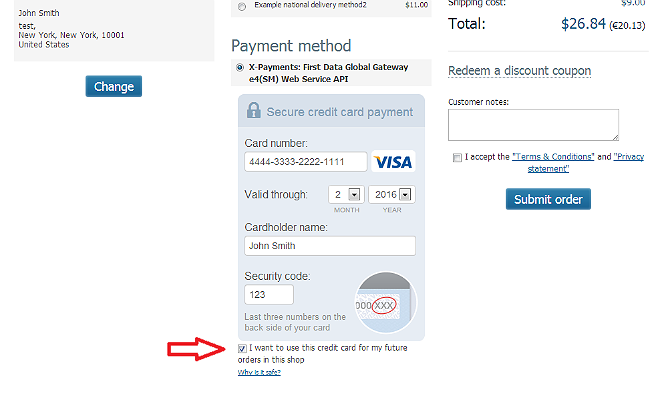
- During checkout, registered customers can save their credit card details for future orders at your store:
Customers who have saved credit cards in their account can choose which card to use for each specific order: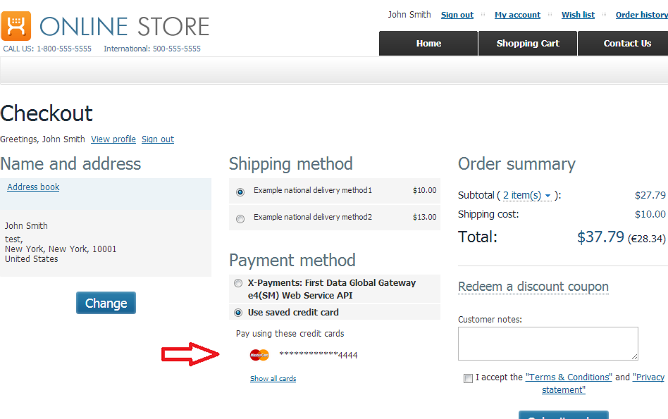
They can also manage saved credit cards in their user account details: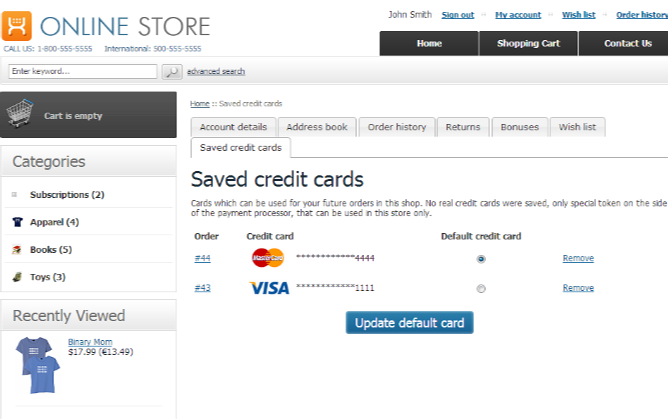


- You can create new orders and charge your customers' saved credit cards for them. See Charging Saved Credit Cards.
- You can create subscriptions and accept subscription payments from your customers' saved credit cards. See Managing Subscriptions.
Using sensitive customer payment information tokenization with the payment gateways named in the heading of this section has some specifics described below.
During the initial transaction - when a customer chooses to save their credit card for future use and enters the credit card information to be saved using a secure form provided by X-Payments - this secure form in which the information is entered requires them to enter a Card Security Code (CSC/CVV2). This code is required only for the authorization of the transaction used to save the credit card info, and it is not saved or stored anywhere. Further payment transactions on the saved credit card do not require that CSC/CVV2 be entered.
However, the merchant back end of each of the above-named payment gateways provides some security settings allowing the merchant to customize the credit card authorization process for online transactions. Among them, there is a setting that can be used to allow or forbid processing of transactions with Card Security Code unavailable. If this setting is adjusted in such a way that CSC/CVV2 is required for all payment transactions at all times, it will cause problems related to the store's ability to use the tokenization feature: for a saved credit card all payment transactions but for the very first one (the one that was used to save the credit card info) will be rejected by the payment gateway because of the missing CSC/CVV2. The payment gateway may generate errors similar to the following: "A validation error occurred while processing this transaction: Card Verification Code not available."
To avoid this problem, make sure that the payment gateway setting requiring the gateway to reject payment transactions with no CSC/CVV2 is not enabled. This will not cause your store to stop requesting CSC/CVV2 altogether because the X-Payments secure form employed by your store to collect credit card information treats the CVV field as required at all times - regardless of the payment gateway settings.
Following are instructions for how to achieve proper payment gateway account configuration for specific payment gateways.
- QuickBooks Payments by Intuit Inc.
In the merchant setting, change the setting for If CSC is not available to Accept Transaction:

- Authorize.Net CIM
- Log on to the Merchant Interface at https://account.authorize.net.
- Select Settings under Account in the main menu on the left.
- Click Card Code Verification in the Security Settings section
- Click to select the check box(es) next to the Card Code responses for which the payment gateway should reject transactions. Make sure you do not enable the option to reject transactions where the Card Code is unavailable. This, however, is different from transactions for which the Card Code is incorrect; we strongly recommend you keep the option to reject any transactions with incorrect Card Code enabled.
- Click Submit.
Charging Saved Credit Cards
X-Payments 2.x or later connected to your X-Cart store allows you to charge again credit cards that have been used at your store to pay you via an X-Payments integrated payment method with support for tokenization and have been saved in the customer's user account for future use.
There are two ways you can go about charging a saved credit card - via the X-Payments back end or via the X-Cart back end.
To charge a saved credit card via the X-Payments back end:
- Find the initial payment that was made using the credit card that needs to be charged and open its details for viewing. To find the payment, use filtering/advanced search.
- On the 'Payment details' page displaying the details of the initial payment, click the 'Charge this card again' link. A popup form titled 'Charge this card again' will appear where the parameters of the new payment can be specified:
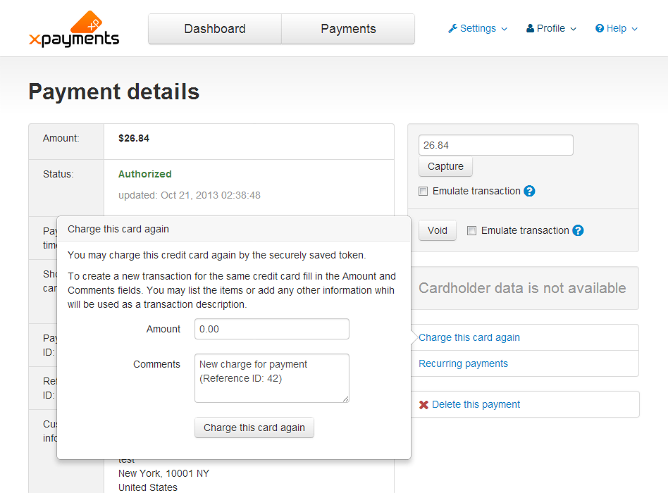
- In the 'Charge this card again' form, enter the amount that needs to be charged. If you wish you can also provide a comment for yourself - something to make your job easier later when you will be figuring out what this payment is for.
- Click the Charge this card again button at the bottom of the form. Confirm the action. The credit card will be charged, and the new payment will be created in X-Payments. The newly created payment will be marked as associated with the initial payment:

- Once the credit card has been charged, go to your X-Cart store's Admin back end and check the 'Order management' section. This section should now contain an empty new order with an order total equalling the amount that has been charged.
- Use X-Cart's built-in Advanced Order Management module to edit the empty new order and add the missing information (products, shipping and taxes information, customer information, etc) as needed.


Video - How to make new orders via the back end of X-Payments 2.x:
To charge a saved credit card via the X-Cart back end:
- In X-Cart's Admin area, go to the 'Create order' page and start creating a new order like you normally do using the built-in Advanced Order Management module. At the step of selecting the customer, select the owner of the credit card that needs to be charged (The credit card needs to be stored in this customer's user account). Click Create new order.
- Continue creating the new order - add products, customer information, etc. At the step of selecting a payment method, select Other + Use saved credit card:
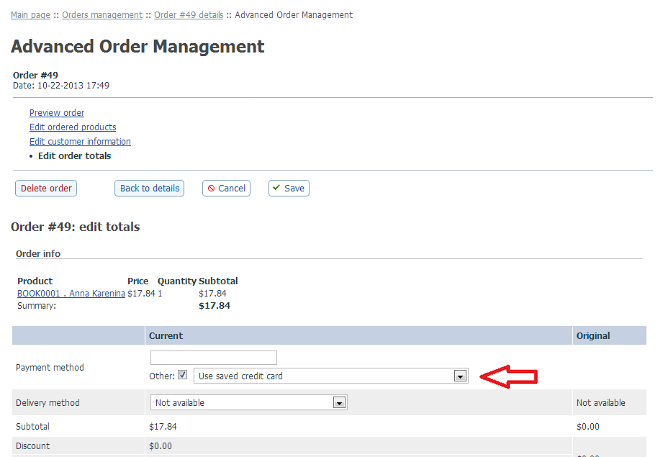 Important: At each step of creating the order (Edit ordered products, Edit customer information, Edit order totals), click the Save button after making any changes; otherwise your changes will not be applied.
 - After providing all the necessary information and saving the changes, click the Back to details button to go back to review order details. On the 'Order details' page you will see a list of credit cards that the customer has saved in their user account:
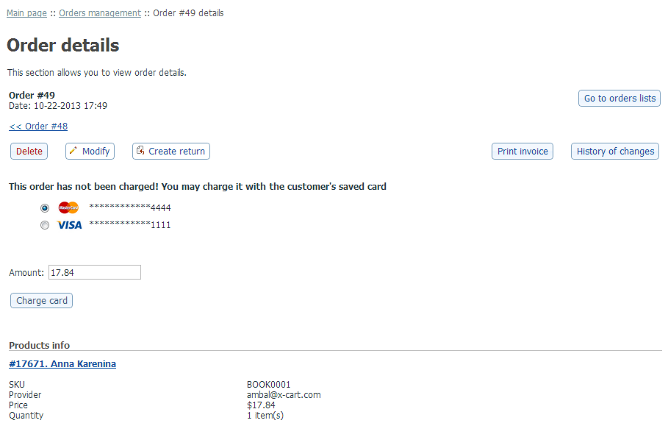
- Select the card you require, use the 'Amount' input box to specify the amount that needs to be charged and click Charge card. The store will connect to X-Payments, and the selected card will be charged.


Video - How to create a new order in X-Cart 4.6.1 integrated with X-Payments 2.x:
Viewing Payments Made with Saved Credit Cards
In X-Payments, all payments made using a saved credit card are linked to the initial payment made using this card and are considered "based" on this payment. You can tell whether a payment was made using a saved credit card by the contents of its Reference ID field: independent payments have reference IDs like "#N", whereas payments based on another payment (payments made using a saved credit card) have a link in the Reference ID field that looks like "Payment #N" and points to the 'Payment details' page of the initial payment.
You can view the full list of payments for a specific saved credit card by using this button on the 'Payment details' page of the initial payment made using this credit card:
Managing Subscriptions
With X-Payments connected to an X-Cart store, you can set up product subscriptions (recurring payments).
In X-Payments 2.x we had a built-in subscriptions feature that could be used to set up recurring payments based on any payment made using a payment method with tokenization support.
Starting with X-Payments 3.0, the native recurring payments feature in X-Payments is deprecated and is supported for backward compatibility only. Now subscriptions must be set up using the X-Cart addon X-Payments subscriptions. You still require a payment method supporting tokenization. For detailed information on how to set up and handle subscriptions with the approved X-Payments subscriptions X-Cart addon, see the X-Payments subscriptions addon manual in X-Cart Knowledge Base.
Below we are providing information on the use of X-Payments 2.x native recurring payments feature (the one deprecated in X-Payment 3.0).
To set up a subscription:
- In your X-Cart store, create a product buying which will serve as a subscription setup fee, or first subscription payment, for your customers.
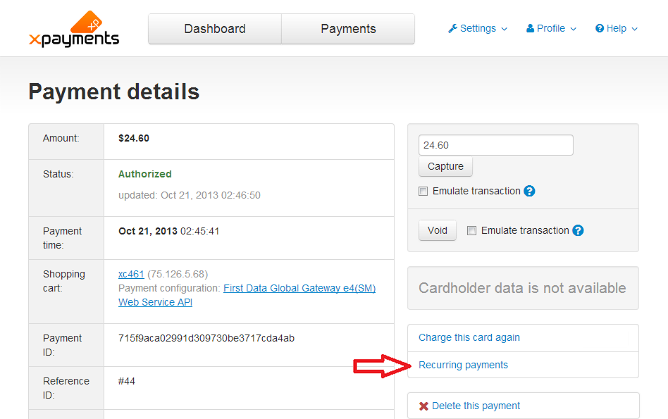
- When a customer buys this product, find the respective payment in X-Payments and open its details. If the payment was made using a saved credit card, locate the initial payment made using this card and open its details.
- On the 'Payment details' page, click on the 'Recurring payments' link:
The 'Subscription management' page opens: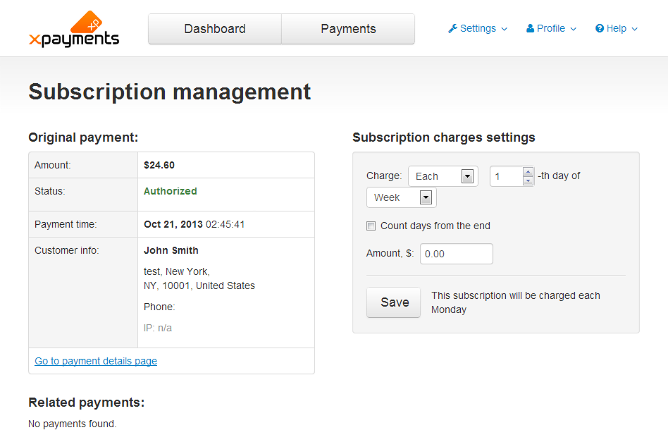
- On the 'Subscription management' page, use the 'Subscription charges settings' form to configure the subscription: choose how frequently the customer is to be charged for the subscription and specify the amount that will be charged every period. Click Save at the bottom of the form to save the changes.
- After saving the subscription settings, note that the subscription now has the disabled status:
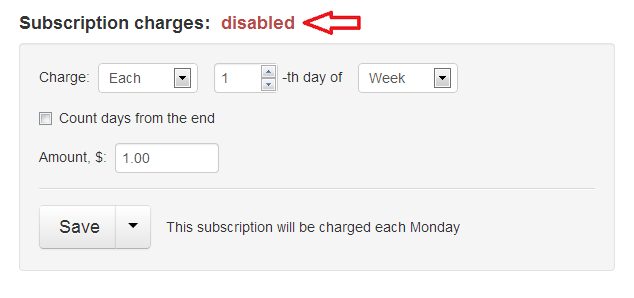
To activate the subscription, click the button dropdown element at the bottom of the form and select Activate subscription: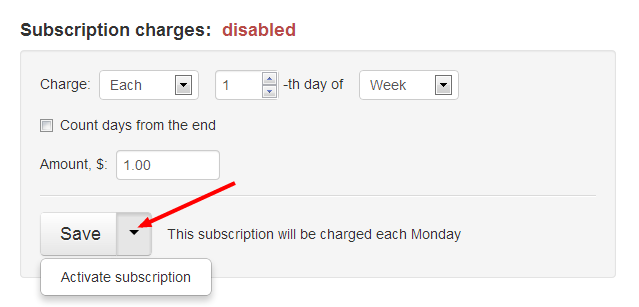


That is all. Now X-Payments can charge the customer's saved credit card according to the subscription settings you have specified.
When you start receiving subscription payments from your customers, you will be able to track each subscription payment down to the initial payment on which it was made: simply follow the "Payment #N" link in the table cell specifying the payment's Reference ID.
To view all payments for a specific subscription, open the details of its initial payment and, on the 'Payment details' page, click on the 'Recurring payments' link. The list of all payments made on this subscription will be displayed in the 'Related payments' section of the 'Subscription management' page.
Every subscription payment is a separate payment in X-Payments, and you can manage it the same way as any other ordinary payment in X-Payments (refund, decline, etc).
In X-Cart, a separate order is created automatically for each subscription payment. Orders created for subscription payments are initially empty (no products, no shipping, no taxes - just the order total), but, if you need, you can edit them using X-Cart's built-in Advanced Order Management module to complete the missing information.
Video - Built-in subscriptions management in X-Payments 2.x integrated with X-Cart 4.6.1:
Get/update tokenized card feature
Starting with X-Payments version 3.0, X-Payments supports the Get/update card feature for some payment integrations. These include:
- Authorize.Net;
- Chase Paymentech Orbital.
The Get/update card feature aims to protect your customer relationships by enabling you to quickly and easily update the details of tokenized cards that have been used for payment at your store (including the masked card number, expiry date, etc.)
Customer card information may change for a variety of reasons, including card expirations, lost or stolen cards, upgrades and so on. The Get/update tokenized card feature enables you to provide uninterrupted service to your customers keeping the updating process transparent to them.
To use the feature, you will need to enable the payment gateway's card information updating service in your payment gateway account (or, depending on the gateway, to have the gateway support enable it for you). This way you will get access to the gateway's interface allowing you to request an update of information for the credit cards that have been previously saved for use at your store and are now stored in the gateway's secure vault. Depending on the gateway, the tools you will get for updating your customers' payment card information will range from the simplest button that you click to request an update to more complex schedulers enabling you to schedule payment information updates according to your needs. After you request an update of your customers' payment information, the gateway will submit a request to VISA/Master Card to check if there have been any changes for the cards stored by the gateway for use in your store. After VISA/Master Card has processed the request (which may take up to 2-3 days), the gateway will get a report of any changed payment card details. Based on the report, the information stored by the payment gateway will be updated to reflect the changes. The updated cards will then be linked to the existing tokens. This way your store will be able to charge the cards after re-issue using the same old tokens already stored by X-Payments.
In X-Payments, you also get a button allowing you to request an update of information for any card involved in tokenized payments directly from the page of any payment made using that card:

If a customer with a tokenized card makes a payment at your store via X-Payments after the card has been re-issued, the card information will be updated automatically and transparently to the customer.
|