X-Payments:Payment configurations
- X-Payments:General information
- What's New
- System requirements
- Installation
- Two-factor user authentication
- Configuring X-Payments
- Managing users
- Customizing the interface
- Managing payments
- Unistalling X-Payments
- Upgrading
- Moving X-Payments from one host to another
- Viewing X-Payments logs
- FAQ
- Troubleshooting
- Glossary
- Supported payment gateways
- Popular Payment Methods Configuration Instructions
Contents
Adding a Payment Configuration
An important part of configuring X-Payments is creating a payment configuration. A payment configuration enables an online store to connect to your chosen payment gateway. You need at least one payment configuration for any store working with X-Payments. If you need to accept payments in more than one currency, you will want to add a payment configuration for each currency you are going to use. Payment configurations in X-Payments can be managed via the 'Payment Configurations' section (Settings -> Payment configurations):

To add a new payment configuration, select the name of the required payment module from the drop-down box and click the Add new button.

For the sake of example, we will add a payment configuration to accept payments in USD via Authorize.Net.
We start by selecting the Authorize.Net payment module:

The 'Add new payment configuration' for Authorize.Net page opens:

Here we adjust the settings to provide the information needed by X-Payments to access the payment gateway and specify our payment configuration preferences. Note that the payment gateway connection details will be different depending on the payment gateway selected, but some fields will be common to most configurations:
- Name: Name to identify the payment configuration in X-Payments and the store control panel. You can keep the proposed name or choose to change it. For example, if you are going to have more than one payment configurations based on the same payment module - like when you want to use more than one currency - it is best to change the name so you can see which payment configuration you are dealing with without having to open its details. For example, we can change the name to "Authorize.Net - USD" to reflect the name of the currency that is going to be used for payments via this configuration.
- Test/Live mode: Whether you are using a development/sandbox environment or a production environment.
- Initial transaction: Auth or Auth and capture.
- Order prefix: Your trading name or any other prefix that will help you to identify a payment transaction as originating from this specific online store.
- Currency: The currency to use for payments.
- Security code required: Whether the buyer should be required to enter a Card Verification Value on the payment page.
- Credit card types: The credit card types you are going to accept.
- Cancel not captured: Whether authorizations obtained for payments made in the "auth only" mode should be voided automatically within 30 days of payment if capture of the funds has not been performed.
- Use in online stores: The store(s) in which this payment configuration must be used. This setting is only available in X-Payments Multistore.
After adjusting the payment configuration settings as you require, be sure to click Save to save your changes.

The payment configuration will be enabled, and you will find a few more settings added on the same page:
- 3-D Secure: What 3-D Secure provider should be used for the payment configuration and the current status of 3-D Secure payer authentication for this payment configuration (Enabled/Disabled).
- Antifraud: What Antifraud service provider should be used for the payment configuration and the current status of Antifraud service for this payment configuration (Enabled/Disabled).

You may adjust them now or at a later time. In any case, you will be able to find and edit the payment configuration you have created via the 'Payment Configurations' section (Settings -> Payment configurations).

More information on payment configurations for the following payment modules is available:
- PayPal: PayPal Payments Pro (PayPal API), PayPal Payments Pro (Payflow API), Payflow Pro
- PayPal REST API
- First Data Payeezy Gateway (ex- Global Gateway e4)
- CyberSource - SOAP toolkit API
Payment Configurations List
Payment configurations that have been added in your X-Payments installation can be viewed and managed on the 'Payment Configurations' page (Settings -> Payment configurations). On this page you can see the list of available payment configurations:

For each payment configuration on the list you can see the name of the payment module employed, the number of submitted payments and the current status of the payment configuration (Enabled or Disabled). Payment configurations set to work in test mode are marked with the "test" icon.
X-Payments 2.1 and later:
- Payment configurations that support 3-D Secure payer authentication are marked as such: the ones that use 3-D Secure via Cardinal Commerce have the link "3D Secure: CardinalCommerce" next to their name (the link leads to a page where 3-D Secure settings for the respective payment configuration can be adjusted); the ones that rely on a 3D Secure solution provided by the payment gateway are marked by the words "3D Secure: Built in". For each payment configuration supporting 3-D Secure transactions there's an icon showing the current status of 3-D Secure payer authentication service (Enabled or Disabled).
- Payment configurations that support KOUNT Antifraud screening are marked as such. The Configure link allows you to access the KOUNT Antifraud screening settings page for the respective payment configuration. For each payment configuration supporting KOUNT there's an icon showing the current status of the antifraud screening service (Enabled or Disabled).
On 'Payment Configurations' page you can:
- Open the details of a specific payment configuration for viewing/editing;
- Enable/disable payment configurations;
- Delete payment configurations;
- X-Payments 2.1 and later: Access the CardinalCommerce 3D-Secure configuration settings page and the KOUNT Antifraud screening settings page for any payment configuration that supports these services.
Assigning a Payment Configuration to an Online Store
(Needs to be done in X-Payments Multistore edition and X-Payments versions prior to X-Payments 3.0. Users of X-Payments Hosted with a single online store integration do not have to assign payment configurations to their online store manually because all the payment configurations they configure and enable in X-Payments are assigned to their only online store automatically.)
After adding and configuring in the X-Payments back end of a payment configuration you require, you need to assign it to the online store where you want to use it.
A payment configuration can be assigned to an online store using one of the following methods:
- Via the 'Online store details' page:
- Open the details of the store to which you wish to assign a payment configuration for viewing/editing.
- In the Payment configurations box, select the payment configuration that needs to be assigned.
- Click Save.
- Via the 'Payment configuration details' page:
- Open the payment configuration's details page for viewing/editing.
- In the Use in online stores box, select the store to which the payment configuration needs to be assigned.
- Click Save.
Viewing the Details of a Payment Configuration
To view the details of a specific payment configuration, click on its name in the 'Payment Configurations' list. The 'Payment configuration details' page opens showing all the information related to the payment configuration.
On this page you can:
- View/edit the details of the payment configuration;
- Enable/disable the payment configuration;
- Delete the payment configuration.
Enabling/Disabling a Payment Configuration
To enable/disable a payment configuration, do one of the following:
- On the 'Payment Configurations' page:
X-Payments 2.0 and later: Click the button dropdown element opposite the payment configuration name and select the required action (Enable / Disable) from the menu: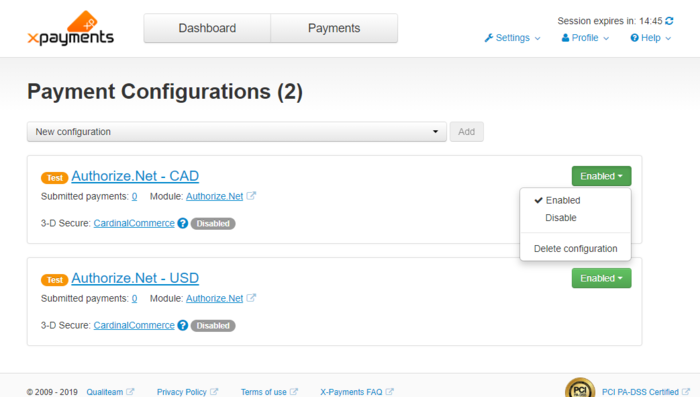
X-Payments 1.0: Click the [ enable ] / [ disable ] link opposite the payment configuration name. - On the 'Payment configuration details' page:
X-Payments 2.0 and later: Click the button dropdown element near the 'Name' field: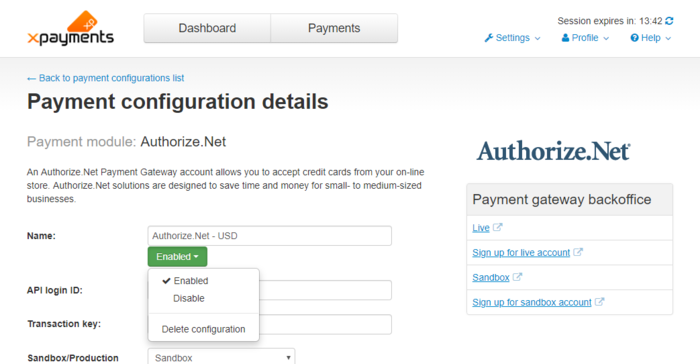
or at the bottom of the page: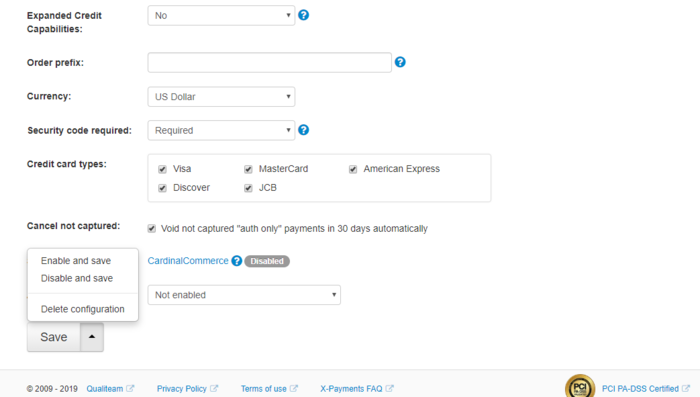
and select the required action (Enable (and save)/Disable (and save)).
X-Payments 1.0: Click the [ enable ] / [ disable ] link below the 'Name' field.


Editing the Details of a Payment Configuration
To edit information about a payment configuration:
- On the 'Payment configuration details' page:
Edit the contents of any editable fields and click Save.
Deleting a Payment Configuration
To delete a payment configuration, do one of the following:
- On the 'Payment Configurations' page:
X-Payments 2.0 and later: Click the button dropdown element opposite the payment configuration name and select the required action (Delete configuration) from the menu. Confirm the deletion.
X-Payments 1.0: Click the delete icon opposite the payment configuration name. Confirm the deletion.
 - On the 'Payment configuration details' page:
X-Payments 2.0 and later: Click the button dropdown element near the 'Name' field or at the bottom of the page and select the required action (Delete configuration). Confirm the deletion.
X-Payments 1.0: Click the Delete configuration link at the bottom of the page. Confirm the deletion.
|