X-Payments:NoFraud fraud prevention
- X-Payments:General information
- What's New
- System requirements
- Installation
- Two-factor user authentication
- Configuring X-Payments
- Managing users
- Customizing the interface
- Managing payments
- Unistalling X-Payments
- Upgrading
- Moving X-Payments from one host to another
- Viewing X-Payments logs
- FAQ
- Troubleshooting
- Glossary
- Supported payment gateways
- Popular Payment Methods Configuration Instructions
Starting with version 3.0.2, X-Payments provides integration with NoFraud. NoFraud is a comprehensive fraud prevention service that employs every known fraud prevention technology in a single centralized system, producing the most precise decision-making fraud prevention application. NoFraud sits between your store site and your payment gateway reviewing payment transactions in real time through complex algorithms so that only the legitimate transactions are sent to the gateway for processing. Any transactions declined by NoFraud are bounced back to the customer while they are still at the cart. Approved transactions are passed along to the gateway for uninterrupted processing. For the small percentage of transactions where a Pass or Fail decision is not available, NoFraud can contact the cardholder for verification. This eliminates the need for manual review of transactions and prevents the declining of legitimate customers. NoFraud takes just a few minutes to set up and does not require training or dedicated staff to run or maintain. With no setup fees and low per-transaction billing rates, NoFraud allows anyone to try the system with little risk. All you need to do is choose a plan to match your needs. You can even get a one- or two-week free trial by contacting NoFraud at info@nofraud.com or 888-773-3669.
Getting started with NoFraud
NoFraud integration is included with X-Payments versions 3.0.2 and later and does not require installation. You will need a NoFraud account.
To start using NoFraud, complete the steps below:
- If you haven't yet done so, sign up for a NoFraud account.
- After creating your NoFraud account, log in to the Account Manager portal.
On the bottom left of your portal account, you will see a few tabs that require merchant information input. Make sure all the required information for your account has been provided correctly. NoFraud provides some help guides and references in their "Help Center". For example, you can find a thorough explanation of all the settings here.
Please pay particular attention to the "Integration" tab, on the bottom-left corner of the page. Through this tab, you will need to select the type of integration you are using. On the "Integrations" page, you will see a button in the upper-right corner that says, 'Create New Integration'.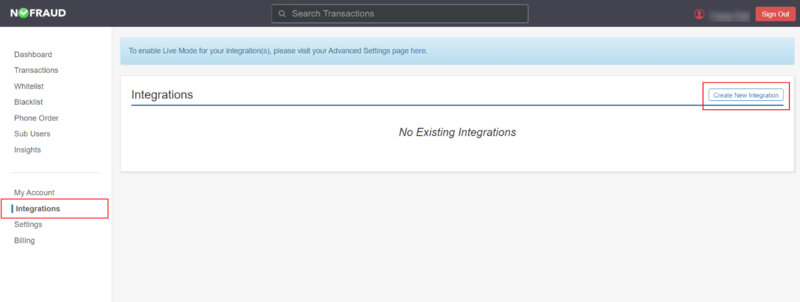
Click on it and a pop-up will appear; prompting you to enter Integration Name, Site Name, Site URL and Integration Type. After entering in relevant Integration Name, Site Name, and Site URL, under Integration Type choose ‘Direct API’. Once selected, additional options for Site Platform, and Payment Gateway will appear – Site Platform will be X-Cart and Payment Gateway will be your specific payment gateway. Once all pertinent information is recorded, press the blue 'Create Integration' button at the bottom of the pop-up.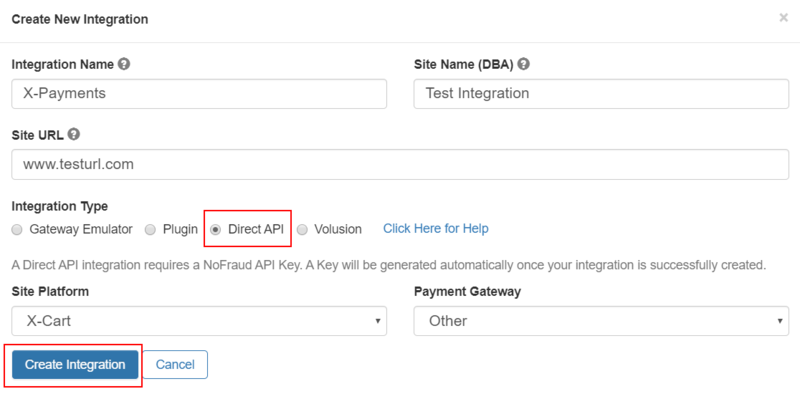
After the new integration has been created, on the "Integrations" page, you will see your newly created integration. Click the 'View / Edit' button to open integration details.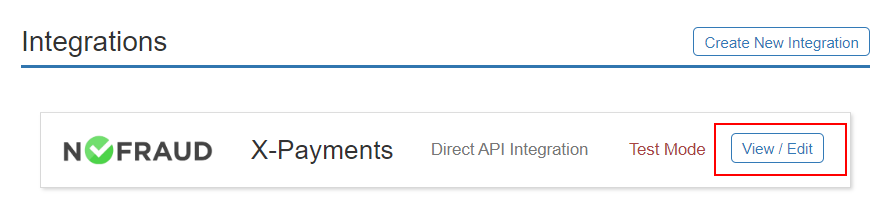
On the pop-up that appears after clicking 'View / Edit', please look for the section in the middle of the pop-up where it says 'Your NoFraud API Key' – please note, this code is automatically generated. You will need to copy this code from your NoFraud portal account and input it into the appropriate field in X-Payments. To copy the code, click the hyperlinked blue text stating 'Click to Copy API Key'. Once clicked, you will get a confirmation text of 'Copied!' to let you know the text is now on your clipboard.
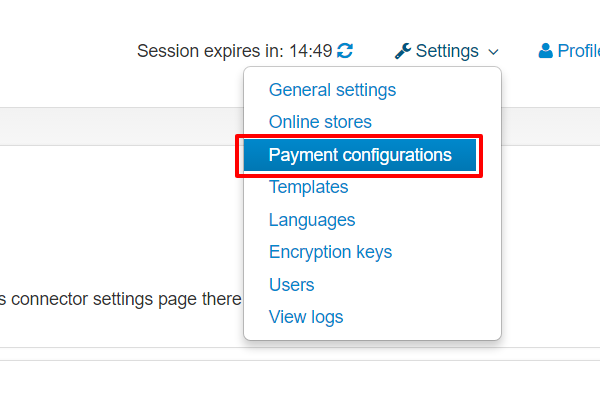
- In a new browser tab or window, log in to X-Payments and go to the 'Payment Configurations' page (Settings -> Payment configurations).
- Locate the payment configuration with which you are going to use NoFraud and open its details for editing. If you haven't yet configured a payment configuration, add and configure one as provided in the section X-Payments:Payment_configurations.
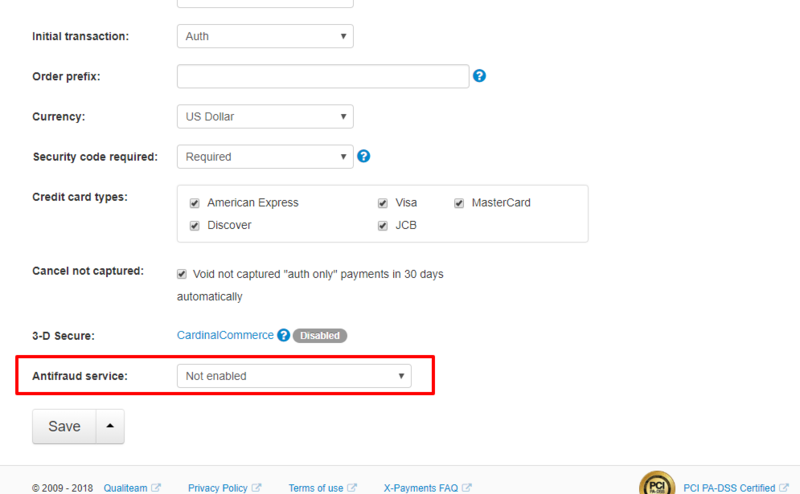
- In the payment configuration details, check the Antifraud service setting. If you haven't been using any antifraud service for the current payment configuration so far, this field will be set to "Not enabled".
Reset this field to "NoFraud - Full Service Fraud Prevention".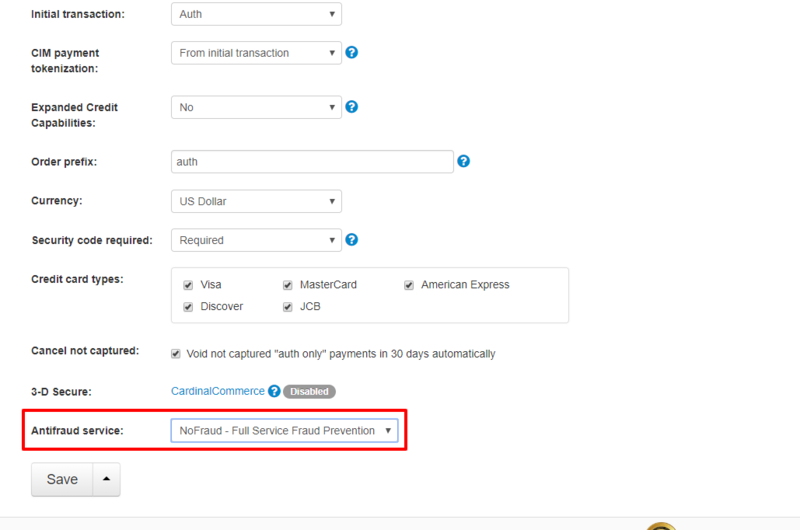
Click Save to save the changes. - Click Configure to access the NoFraud settings page for the current payment configuration:
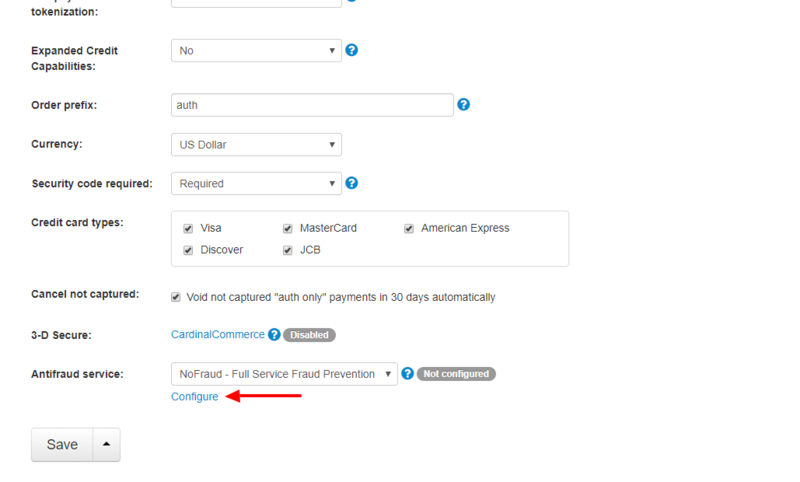
- Adjust the settings on the NoFraud settings page:

- Status (Not configured / Enable / Disable): This setting indicates whether NoFraud module is active. For now just leave it as is. After you provide the rest of the required settings (below) and save the changes, NoFraud module will be enabled automatically. You will then be able to use this setting to disable/re-enable NoFraud for your current payment configuration as you require.
- API key: Use this field to input the API key code you have obtained in your NoFraud portal account.
- Test/Live mode: Set the mode for your NoFraud integration. Note that this setting must match the mode you have chosen for your NoFraud integration in your portal account settings.
- Save the changes by clicking Save.
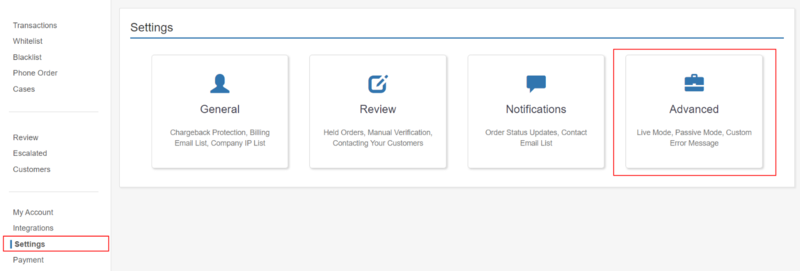
- Once you are ready to go live and you are ready for NoFraud to begin screening the orders placed on your site, please navigate to the "Settings" tab within the NoFraud portal. Within this page, click on the "Advanced" settings option.
On the Advanced Settings page, ensure that the dropdown is the appropriate integration. Click on the box labeled 'Live Mode' and a pop-up will appear. In the pop-up, click the 'Disabled' toggle, which will flip the field to 'Enabled'.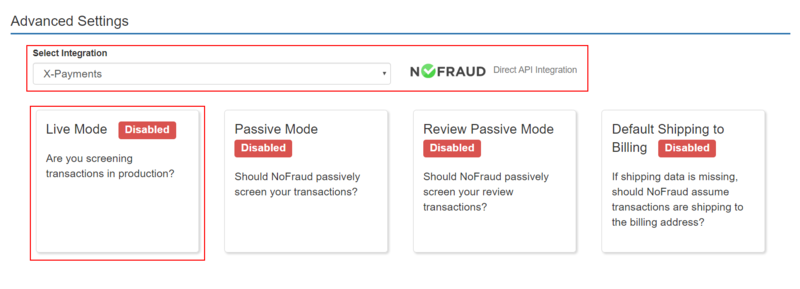


That is all; NoFraud service has been activated for the payment configuration in question. From now on, any payment transactions via the payment method enabled by the said payment configuration will be screened by NoFraud.
Important: NoFraud will not screen transactions made using a previously saved credit card.
Using NoFraud
Once activated for one or more payment configurations in X-Payments, NoFraud works automatically for all the incoming payments via the respective payment methods.
What happens when a buyer submits their credit card info to pay for an order in a store accepting payments via X-Payments and protected by NoFraud?
Technically, the process involves three steps:
At the first step, X-Payments makes a call to NoFraud to invoke NoFraud fraud screening service. In this call, information about the payment transaction (including the IP address, email address, shipping address, card details, billing info, order details, etc.) is submitted to NoFraud. This happens for each new card prior to contacting the payment gateway. NoFraud’s fraud screening service uses proprietary algorithms to check the information submitted to it and applies the custom rules configured for the merchant's account. NoFraud account settings provide substantial flexibility for configuring the rules. In practice, NoFraud will consider a lot of factors such as the buyer's country, how far the buyer's location is from the location of the store where the purchase is being made, whether the buyer is telling the truth about their location (based on whether the address submitted by the buyer matches the geolocation info collected by the service regarding the IP address from which the purchase is being made), the type of products being purchased (for example, if the buyer has a history of consistently using the card to buy car parts and suddenly pays for $2000 worth of makeup and beauty products) and so on. As a result, NoFraud’s fraud screening service responds with a decision as to what should be done about the transaction in question (whether the transaction looks safe and should be processed, or whether it looks suspicious and should be declined). X-Payments will honor the decision returned by NoFraud. If the decision is to process the transaction, X-Payments will continue with the transaction processing by submitting the details to the payment gateway. If the risk decision is to decline the transaction, X-Payments will block the transaction and not contact the payment gateway. This way high risk transactions are blocked automatically before they become a problem, and the merchant does not have to pay the payment processor for processing a card that might have been stolen.
At the second step, X-Payments contacts the payment gateway for order processing. This, of course, does not happen for transactions that have been blocked.
At the third step, X-Payments once again contacts NoFraud to find out the transaction result, including the results of the CVV и AVS checks. NoFraud's fraud screening service also stores this information for future use.
The results of checking by NoFraud can be viewed in X-Payments, in the admin back end of the online store and in the NoFraud portal.
To view NoFraud results in X-Payments:
- Go to the ' Payments' page and locate the payment for which you would like to view the NoFraud results.
- Click on the Reference ID of the payment to access the payment details.
In the table with the payment details, you will be able to see whether the NoFraud check has been passed successfully of failed in the "NoFraud results" section: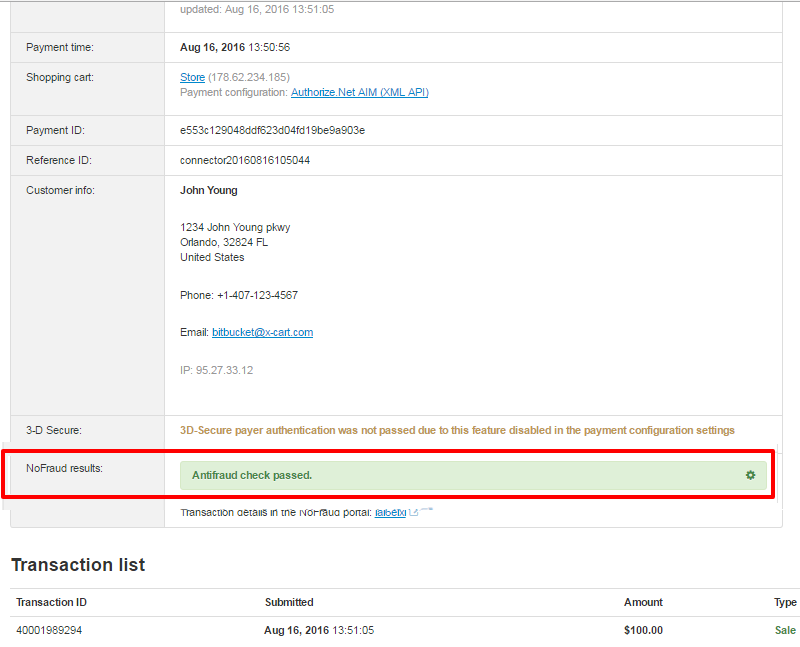
If NoFraud is not able to set either 'passed' or 'failed' status right away, it sets the status 'being reviewed by NoFraud'. In this case the NoFraud result will be as follows: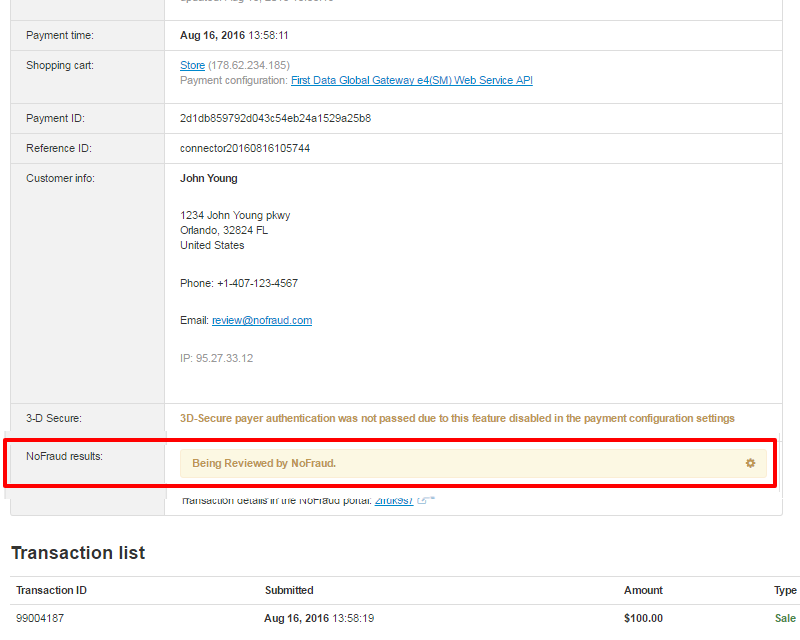
The status 'being reviewed by NoFraud' means that NoFraud needs time to conduct additional customer verification. Once the process is completed, NoFraud will send the final verification result to the X-Payments administrator by email. Note that the NoFraud status of the payment in X-Payments will not be updated.


To view NoFraud results in your online store's back end, go to the section where you view order details. The result of checking by NoFraud will be available in the order details similarly to what you see in X-Payments. Here's an example of NoFraud results shown in X-Cart 5:

To view the results of a NoFraud check in the NoFraud portal, simply follow the transaction ID link (provided both in the details of the payment X-Payments and in the order details in your store's back end):
